How to register, set up and update your new device.
Congratulations on purchasing your new HX2 Navigator.
Unlike many older navigators, the HX2 does all of its registration and updates over a Wi-Fi connection to the internet. Therefore to set up your HX2 correctly you will need access to a good internet Wi-Fi connection.
To turn on your HX2, press the small button on the top of the unit for 1-2 seconds and release.
Step 1: Wi-Fi Connection
When you receive your HX2 it may have had some software updates already performed at the factory. If this is so you will see the main home screen come up after it has started.

If you have this screen, please press the three Horizontal lines on the top left hand corner.

Scroll down the list and press "Tutorial".

If you have a unit that has not been updated or you have pressed "Tutorial" you should see the welcome screen.

Swipe from right to left,

Swipe from right to left again,

And then press on " VIEW WIFI SETTINGS"

This will open the units Wi-Fi selection screen.
Turning on the Wi-Fi.
Tap on the button on the right hand side to turn the Wi-Fi on.

When the Wi-Fi is on, the bar at the top turns a Cyan colour and local Wi-Fi signals will be detected. ( The picture shows Wi-Fi signals near me, yours will be different)

Select your Wi-Fi, enter the password and press connect.

If the word "Connected" comes up under your selected Wi-Fi you have been successful.

Now press the arrow in the top left hand corner to return to the previous screen
You can now see that the unit is connected to Wi-Fi.

Step 2: Registering your HX2.
Swipe from right to left again and press new account.

Fill in the details to register your unit.
Your username should be unique - you can use your email address if you wish.

To move to the next field, press the arrow in the bottom right hand corner.

Once you have filled in all the fields, press "Register".
If you have been successful you will progress to this screen - press "Lets Go".

Step 3: GPS signal
Now check that the Satellite icon is lit up white and the time and date are correct.

If they are not, talk a walk outside ( hopefully clear skies) until the unit finds some GPS signals and resets to the correct time and date.
Step 4 : Data Sync.
If your unit has been signed in correctly it should automatically begin doing a Data Sync.
You will see this screen:

The HX2 will automatically run the SYNC and POI updates for your and then return to the main screen. Move down to the next step - Software Updates.
If your unit started up in the Home page:
- Tap on the icon containing a cloud with two arrows inside it.


Once that has finished, then tap on the "Update Now" button For POI, maps & settings.
When that is finished press the arrow in the top left hand corner to return to the main screen.
Step 5: Software Updates.
From the home page:
- Tap on the software download icon (located on the bottom left hand side). If there are updates available, you will see a numbered red dot on the icon.
In the example below, there are 3 updates available.
Once you have tapped the icon you will be taken to the software update page. Here you can see which software versions are installed, and if there is an update available to download.  If an update is available, there will be an orange button displaying “Install Now”. Tap on this button, then "Install" to install the update.
When your update has finished installing, you will get a notification with the options "Done" or "Open".
Tap on the "Done" button, then return to the software update page to begin the next download.
Once all items say "Updated" and there are no "Install Now" buttons, you can use the back button to return to the home screen. ( The small triangle at the bottom of the screen pointing left)
This only updates the software on your HX-2 but not any of your offline maps, those will have to be done separately via the steps below.
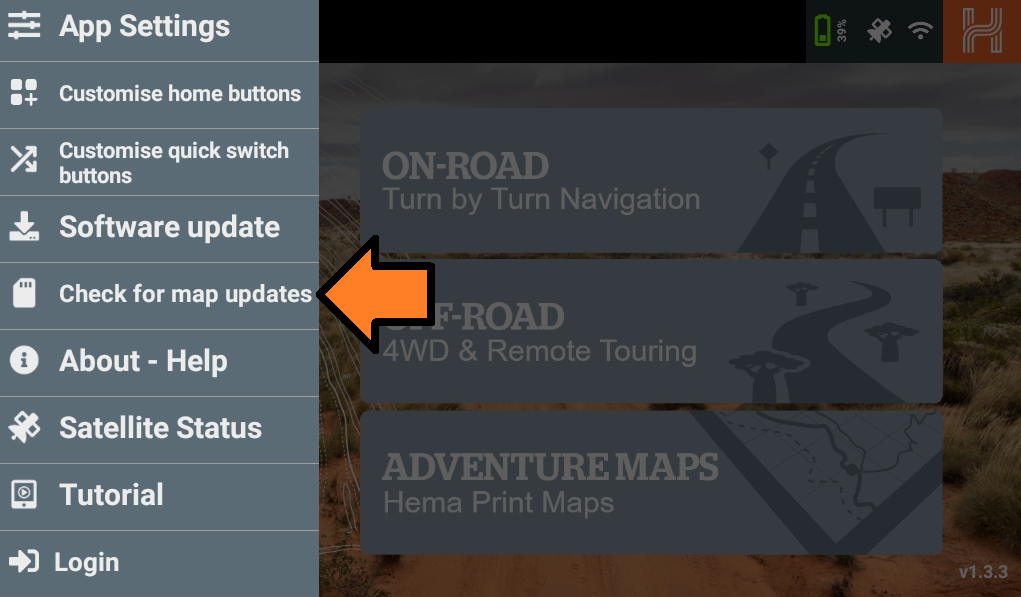
Step 6: Check for Map Updates.
To update the on-road and off-road maps, open the menu using the button in the top left corner of the home screen. (Three horizontal lines)

Scroll down nearly to the bottom of this menu and select 'Check for map updates'.
Here you will likely be prompted to restart your HX-2 into update mode, press the update mode button to continue.
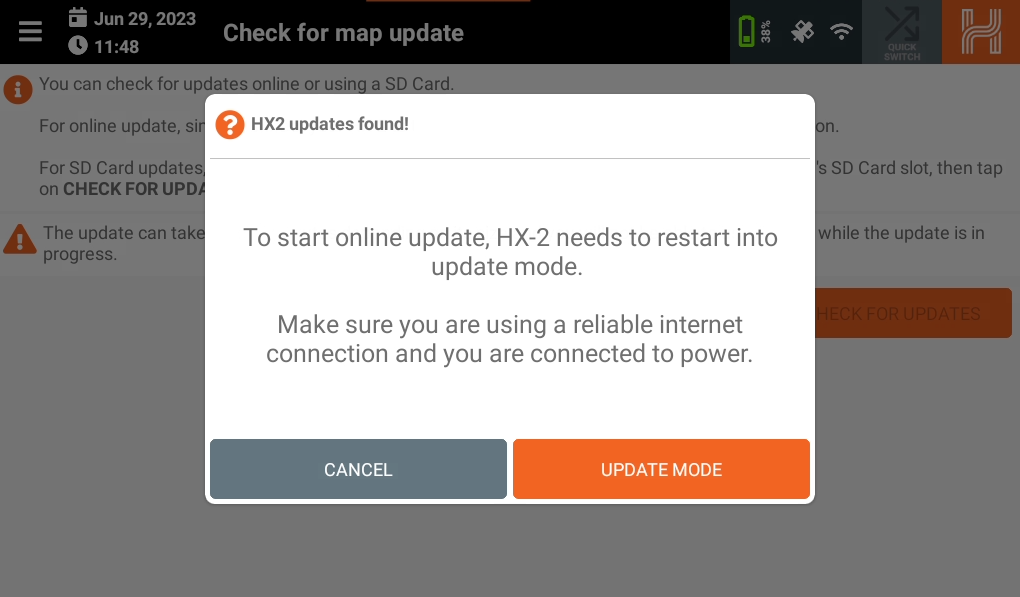
If you didn't get this prompt, or accidentally cancelled it, press the check for updates button.
Once in update mode, you may need to scroll or press the arrow button to reach the bottom of the warning message, then press OK to continue.
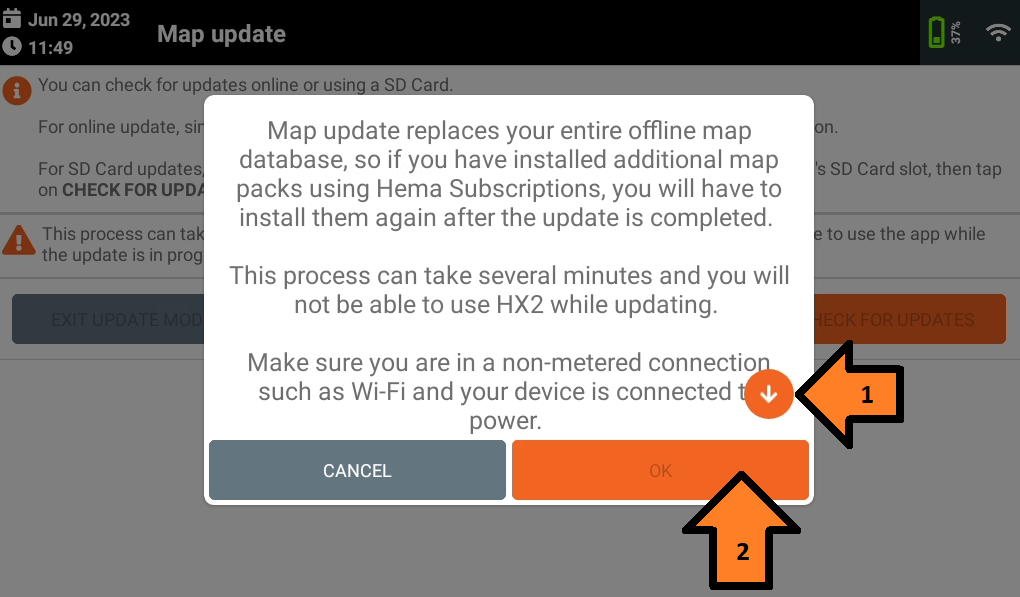
Note: This may take from 45 minutes to 1 hour, so we would recommend to plug your unit in and to not press anything or try to use your HX-2, until all updates are finished.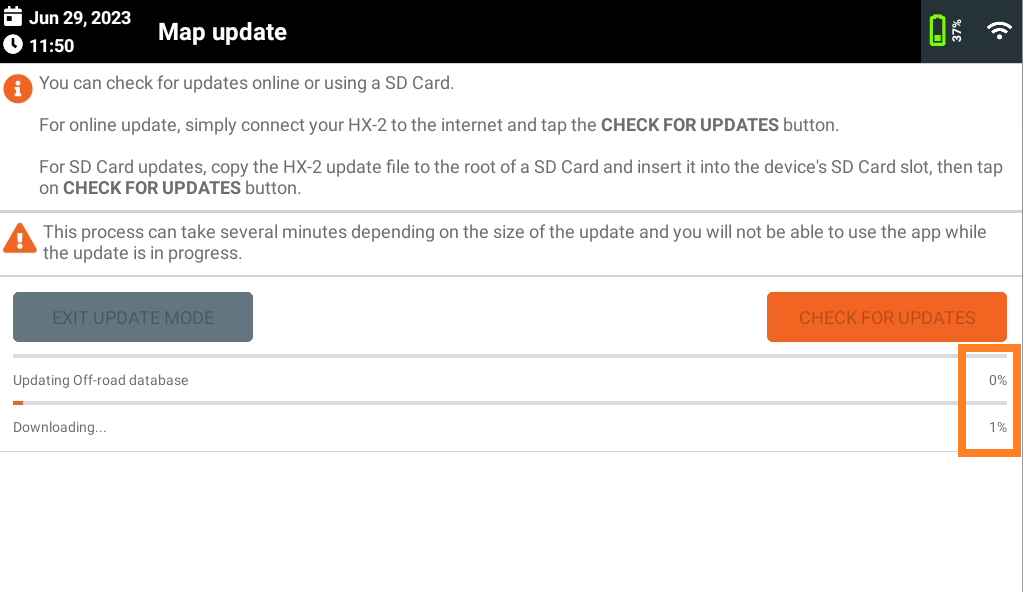
There are two progress percentages, let both of these finish and then the unit will prompt you to reset it.
Step 7: Turn Wi-Fi back off.
Once the unit has turned on again after it has reset, we recommend turning off the Wi-Fi on the HX2 and only use that when doing a data sync or checking for new updates.
Congratulations, you have successfully registered and updated your HX2.