.png?width=128&height=72&name=Hema%20Maps%20Logo%20(1).png)
The 4WD mode (OziExplorer) software in your Navigator contains a database of Australian place names. The database is called hema australia.names. This file is on all Navigator models, and contains around 80000 named locations.
The database can be searched using the Name Search function.
You can use this feature to do things such as:
- Simply view a location on a map
- You can use it to create a waypoint for later use
- Create a waypoint and "GoTo" the waypoint
- Create a series of waypoints and add them to a route
This article will show you how to use the Name Search feature to create a named waypoint or Goto for a specific location found using the Name Search function..

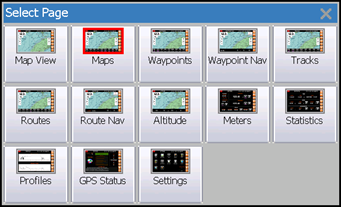
Switch to the Maps page by tapping the Page Select button, and then tapping Maps

On the Maps page, tap the Name Search button. This will open the Name Search window, shown below.

Tap in the Search Entry field at top-left of the Name Search window. A cursor will appear in the search entry field.

Tap the Keyboard button to show the on-screen keyboard, as shown below. (Tapping the Keyboard button repeatedly will toggle the keyboard open / closed).
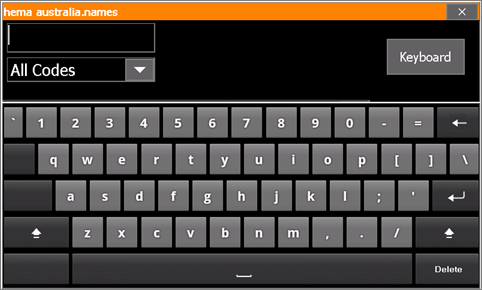
Using the on-screen keyboard, enter the place name (or part of the name) that you would like to search for.
By default, the Name Search function uses the characters you enter as the starting (or left-most) characters to search for. This is controlled by the use of the L option visible on the Name Search window (L for "Left"), which is switched on by default.

Therefore, if the L option is switched on, entering "Alice" in the search field would match all of the following:
- Alice
- Alice Creek
- Alice Downs
- Alice Falls
- Alice Hill
- Alice Park
- Alice River
- Alice Springs
- Alice Springs
- Alice Tableland
- Alice Valley
Note that all of the matches START with the word "Alice".
If you switched off the L option, the search would find anything which has the word "Alice" ANYWHERE in it's name, not just starting with "Alice". Note that with the "L" option switched off, the search will also take a good deal longer.
If you searched for "Alice" without the L option switched on, you would find extra items such as:
- Chalice Lake
- Glen Alice
- Mount Alice West
Note that these items all contain the word "alice" somewhere within their name.
In the example below, we have typed "Alice Springs" using the on-screen keyboard.

-png.png)
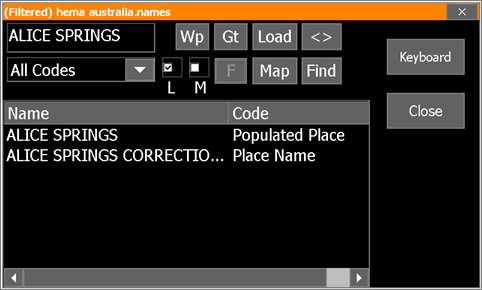
Tap the Keyboard button to hide the keyboard again.

Tap the F button to perform the Filter operation.
The Filter scans the database, looking for any matches to what you typed into the Search Entry field.
There will be a brief delay while the software finds matching entries, then matches will be displayed in the results box in the lower section of the Name Search window, as shown in the example below.
Once you have a list of matching search entries, you need to select one to perform some action on.
Simply tap the entry that you wish to action, which will cause the entry to be highlighted, as shown below:
-png.png)
Now, you can go ahead and choose an action to perform against the selected item (Alice Springs in our example above).
You can choose from the following actions:
- Wp - Create a waypoint from the selected item
- Gt - GoTo - Set the selected item as a destination and start navigating towards it.
- Map - Show the selected item centered on the currently loaded map.
These actions are described below.

Tapping the Wp button (Waypoint) opens the Waypoint Properties window, creating a waypoint with the same name as the selected item, at that item's location.
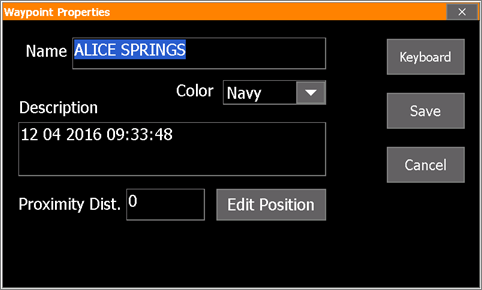
Tap the Save button on the Waypoint Properties window to save your new waypoint.

Tapping the Gt button (GoTo) will start navigating directly to the selected item. This is the same as if you had started navigation to any normal waypoint.

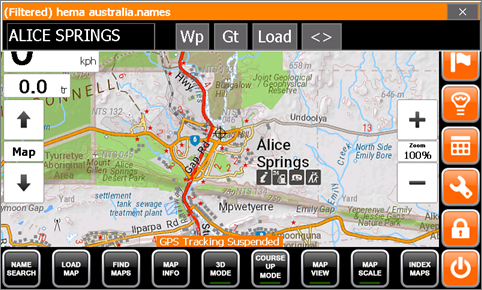
Tapping the Map button will quickly jump to the location of the selected item, and roll up the Name Search window, as shown below:
You cannot perform other actions outside of the Name Search window while it is in the rolled up state. ie. tapping on other buttons such as the Index Maps button will have no effect while the rolled-up Name Search window is visible. You need to close the Name Search window to get back to standard functionality.

To roll the name search window back down, tap the Window Roll-up button. The Roll-up button toggles the Name Search window up / down.

Tap the Close button to exit the Name Search window after you are done using it.