How to load a waypoint file into OziExplorer from a SD card


Hema Navigator HN6 and HN7 ONLY!
The information contained in this article applies ONLY to the Hema Navigator HN6 and HN7 models.
It does not pertain to other Navigator models.
The information shown here appplies equally to the Navigator models listed above.
The appearance of some screens may differ slightly across models, but the process is the same. The screenshots shown here were captured using an HN7.
You have some waypoints which you wish to use in OziExplorer [4WD mode] on your Navigator.
The waypoints need to be in OziExplorer format (.wpt) files to be able to import them for use on the Navigator.
A WPT file can contain one or more waypoints.
The waypoints could have come from a number of sources, such as:
- A friend had a collection of waypoints on their Navigator. They exported them and gave / emailed / copied the WPT file to you.
- You might have created some waypoints based on information from a magazine, book or internet article, using Hema Navigator Explorer on your PC.
- You might have downloaded A WPT file from an internet site.
- You could have been given a file in another format (like a GPX file), and converted the contents into OziExplorer WPT format using a tool such as GPSBabel.
However you came by these waypoints, you now want to import them for use on your Navigator.
The Hema Navigator is pre-configured to use the OziExplorer Data folder on the SD card as the "storage tank" for data which is exported or imported.
The first step is to copy the WPT file(s) you have to the OziExplorer Data folder on your Navigator. You can do this either with the Navigator connected to the PC in Mass Storage mode, or by using an SD card reader, with the SD card taken our of your Navigator for the duration of the copy.
Once you have the file(s) copied to the SD card OziExplorer Data folder, start the OziExplorer program on the Navigator.
When you are importing waypoints, you have some choices:
- You can just import the file(s) directly, which will ADD the waypoint(s) in the imported file(s) to your current WP List.
- If you want to remove all current waypoints and REPLACE them with the waypoints in the imported file, use the DELETE ALL WPs button, to clear your WP List prior to import of new file(s).
- You can import the new file(s) as a Set List. This is useful if you have a single file containing a "set" of waypoints (say a collection of waypoints specific to a trip to Cape York).
Adding to your existing waypoints
Go to the Waypoints page, and tap the Import WPs button. You will see the Import Waypoint File window.
Browse to the folder that contains the file(s) you wish to import. OziExplorer will start in the OziExplorer Data folder on the SD card by default.
OziExplorer allows you to import waypoint files in the following formats:
- .WPT (OziExplorer native waypoint format)
- .OV2 (Tom Tom data file)
- .LOC (open source file format)
- .GPX (GPS Exchange Format)
Note that if the files you are attempting to import do not have valid waypoint data within them, OziExplorer may display an error message, or at the very least, nothing will be imported.
Importing as a Set List
If you have large collections of waypoints related to a specific area (say a region, such as Cape York, or a state, such as Victoria), you may find it more useful to use Waypoints Sets.
A Waypoint Set is a collection of related waypoints. The idea is that by using Waypoint Sets, you can load and unload whole groups of Waypoints in a single operation.
Consider the following example:
You may be performing a job which means you operate in more than one state, so you have a collection of waypoints related to your work in the Northern Territory in a single WPT file.
You might have another collection of waypoints related to operations in Western Australia.
You could simply import the both sets of waypoints into the main OziExplorer waypoint database, but this would mean that your list contains ALL of these waypoints, and it may get confusing, or more difficult to operate. There will be a speed impact as OziExplorer tries to deal with having many waypoints loaded. Also, you may not really need to have all the Northern Territory waypoints loaded while you are working in Western Australia, and vice-versa.
So, the best way to deal with this scenario is to use Waypoint Sets to load each of your states waypoints into.
The first step, as always, is to copy the file you wish to import to your Navigator's SD card. Remember to copy it to the OziExplorer Data folder on the SD card, as this is the default location which OziExplorer uses when you import the WPT file at step XX below.
Once you have the file copied to the SD card, start the OziExplorer [4WD Mode] software on your Navigator.

Tap the Select Page button
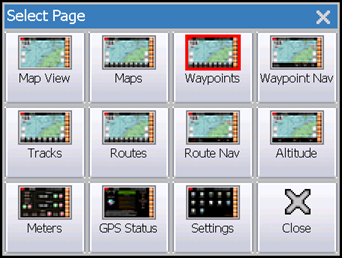
On the Select Page window, tap the Waypoints button to open the Waypoints page.

On the Waypoints page, tap the WP SET LIST button to open the Waypoints Sets window.
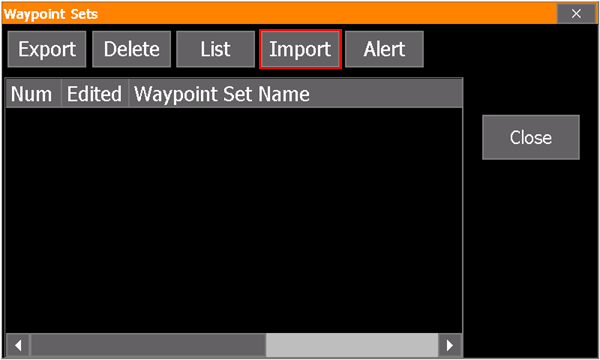

To load a set of waypoints into a waypoint set, tap the Import button.
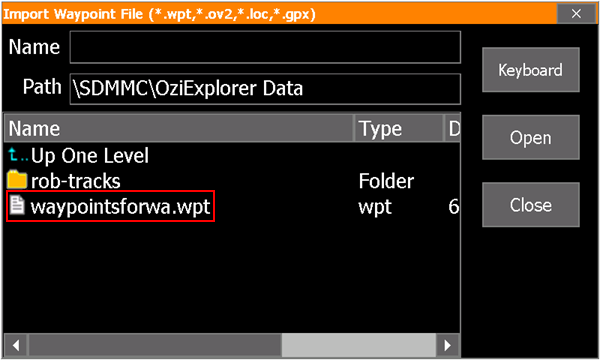
The Import Waypoint file window will open. In the example shown above we wish to load the file called waypointsforwa.wpt.
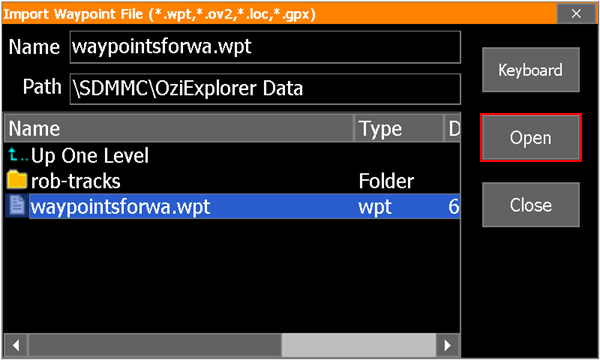
So, to load this file, tap the file name (the file will be highlighted in the list), then tap the Open button.
The file will now be loaded into a Waypoint Set.
If the WPT file you are loading contains a lot of waypoints (eg. thousands of waypoints), be patient, as it will take some time to import large numbers of waypoints.
While the file is loading, do not do anything else within the software.
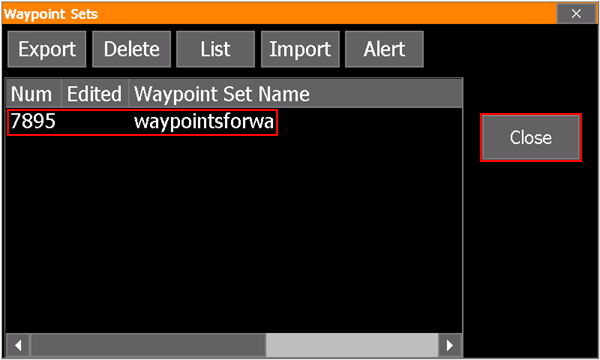
Once the file has loaded, you will see an entry in the Waypoints Sets window showing the imported set. It will show the number of waypoints in the set, and the name of the set (which by default is the same as the file name the set was imported from), as shown in the example above.
You can close the Waypoint Sets window now, by tapping the Close button.

Open the Waypoint list now, by tapping the WP LIST button.
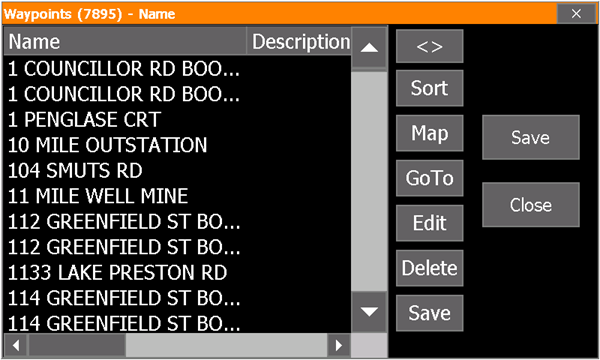
You will see all the waypoints which have been loaded into the Waypoint Set in the previous steps.
If you wish to clear all these waypoints from your Waypoint list, all you need to do is to open the Waypoint Sets window again, highlight the set you wish to unload, and tap the Delete button.
This will clear any loaded sets (but will NOT delete any files permenantly).
.png?width=128&height=72&name=Hema%20Maps%20Logo%20(1).png)