.png?width=128&height=72&name=Hema%20Maps%20Logo%20(1).png)

Hema 4x4 Explorer app User Guide
Introduction
Overview
The Hema 4x4 Explorer App is the first of a new generation of products released by Hema to empower adventures to get out and explore Australia.
The Hema 4x4 Explorer App has been developed to allow users to plan, navigate and share their remote trips with ease and confidence.
About this User Guide
The user guide you are currently viewing will change periodically as new features are added or functionality changes within the app.
While we do our best to make sure that the information contained herein is accurate and useful, you may find a problem, or feel that a certain topic requires more explanation.
In this case, please submit a ticket to our Tech Support department HERE.
Registration
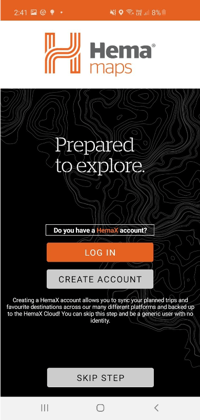
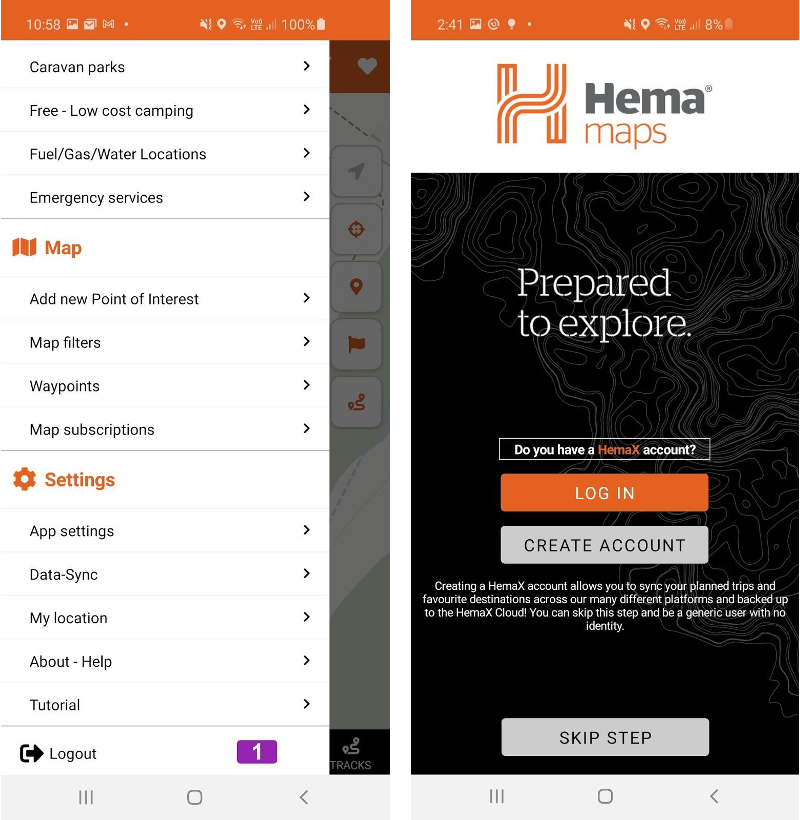
When you start the Hema 4x4 Explorer App for the first time you will be asked to register the App. There are 3 options.
- If you have an existing HemaX account you can Log In with it here.
- If you do not have an existing HemaX account please use Create Account.
- If you do not wish to register the App you can skip this step.
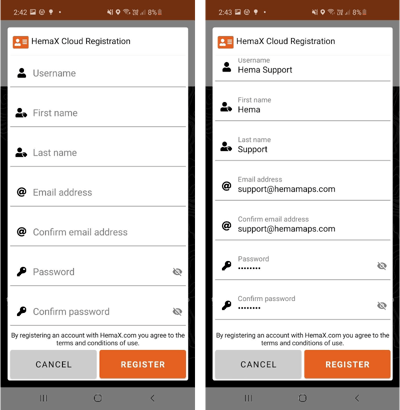
To register the App please fill in the fields as shown to the right and then click Register [4].
Tutorial
After registering your App you will be given a quick tutorial on how to use the App.
You can either Skip or click Next to go through the tutorial.
You can go back to the tutorial at a later stage from the Main Menu and selecting Tutorial
Location Services
Android
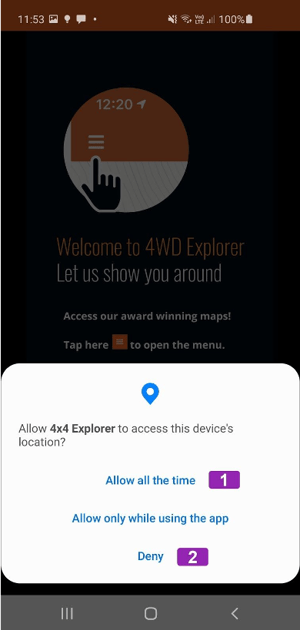
After you have registered your account you will be asked to set how the Hema 4x4 Explorer App interacts with your devices Location Services. After reading then please press OK [3].
We recommend the While using the app [4] setting.
If you select the Only this time [5] option you will need to enable the location services the next time you use the App.
If you select Deny [6] the app will not be able to get a GPS fix on your location and therefore be unable to show your location on the map.
If you have already installed the App and want to change the setting, this can be done from the main settings menu on your device under Location Services.
Apple

After you have registered your account you will be asked to set how the Hema 4x4 Explorer App interacts with your devices Location Services.
We recommend Allow While Using App [1] .
Please note that when you close the App you will be given the choice to Allow all the Time. If you change the setting to Allow all the time the App will still consume power while it is running in the background. If you select Don’t Allow [2] the app will not be able to get a GPS fix on your location and therefore be unable to show your location on the map.
If you have already installed the App and want to change the setting, this can be done from the main settings menu on your device under Location Services.
Please note
Apple devices fall into two categories
- Those that have internal GPS circuitry
- Those that don't have any internal GPS
Generally speaking, the following applies:
- All iPhones have an internal GPS module
- iPads which have cellular (mobile data) access via a SIM card DO have internal GPS module (which works regardless of whether there is a SIM in the slot or not - it is NOT dependent on having a mobile / cellular connection)
- iPads without cellular capability (WiFi only) do NOT have internal GPS
If you wish to use the app to its fullest on a WiFi only iPad, then you must obtain an external GPS. Usually, these connect via Bluetooth, but there are models which plug directly into the port on your device.
If you have a device which does not have an internal GPS, it is up to you to source an external GPS receiver which functions correctly via Location Services on your device. Some searching on Google should provide plenty of information on this topic.
Initial Sync
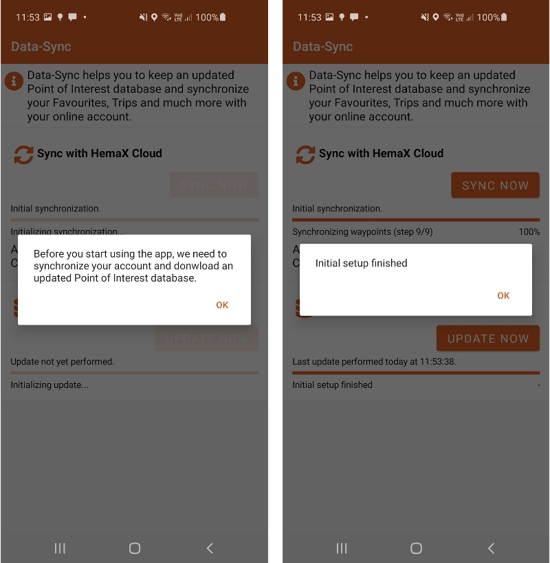
As part of the Initial Setup, the app will sync to the HemaX servers for the first time. Please click on the OK [1] button to start the sync.
When the Initial sync is complete your will be notified, please press OK [2]. After you click OK you will be taken to the Main Screen of the App.
 Getting to know the screen layout
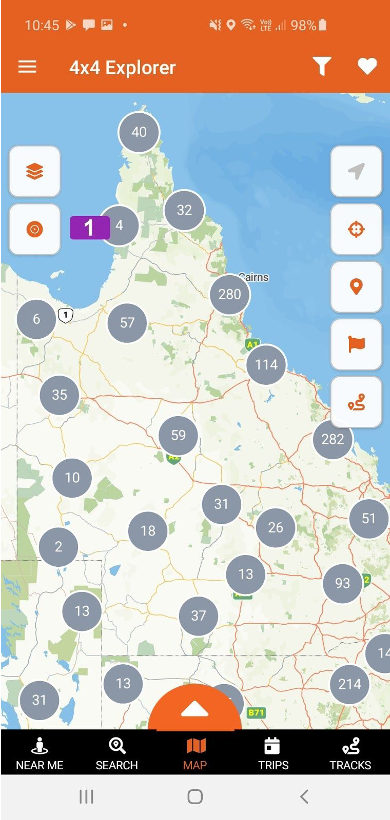
The Main screen of the Hema 4x4 Explorer App is split into three main areas, the Top Main Menu, the Map Screen and the Bottom Planner Menu.
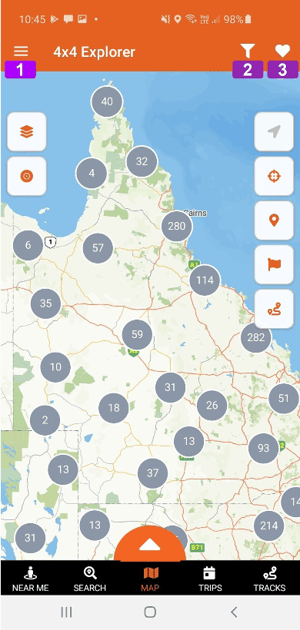
Top Main Menu
There are a number of buttons located on the main screen.
1 Main Menu
This is the main menu system for the Hema 4x4 Explorer App. Please see the Main Menu section for more information.
2 Map Filters
This is where you can select what Points of Interest that are displayed on the Main Map. Please see the Map Filters section for more information.
3 Favourites
This is where you can see any Points of Interest you have favourited. Please see the Favourites section for more information.
Map buttons

4 Search
This is where you can search the main map for points of interest and locations.
5 Map Style
This is where you choose what mapping content you would like to display. Please see the Map Packages section for more information.
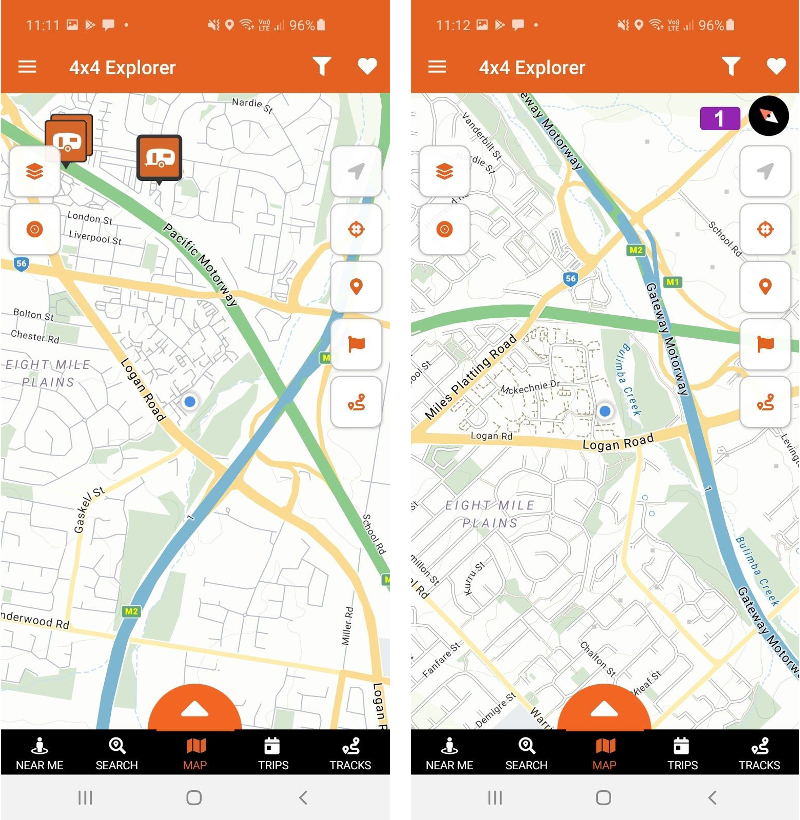
6 Quick record
This button is to enable the quick start recording of a Track. Please see the Tracks section for more information.
7 Measuring tool
This button lets you measure the distance between two points on the map. Please see the Measuring Tool section for more information.
8 Map Key
This button lets you view the map key and legend for the Hema Maps.
9 GPS Lock
This button locks your position to the center of the map. When the icon is grayed out the tracking is off and the app will not track your current location. The arrow in the icon will turn orange when the lock is activated.
10 Center Map
This button centers the main map to your current GPS position.
11 POI On / Off
This button toggles the Point of Interest icons on / off on the main map. When you turn the POI’s off the icon will be grayed out.
12 Waypoints On / Off
This button toggles the Waypoints on / off on the main map. When you turn the waypoints off the icon will be grayed out. Please see the Waypoints section for more information.
13 Show Track
This button lets you view your track and trips on the main screen as an overlay.
Bottom Navigation Bar

14 Near Me
This is where you can see all the Points of Interest around your current GPS location. You can search by Distance or name of location.
15 Folders
This is where you can search the main map for points of interest and locations.
16 Main Map
This is where you can view the main map.
17 Trips
This is where you can plan your next exciting adventure. Please see the Trips section for more information.
18 Tracks
This is where you can see all the tracks you have recorded. Please see the Tracks section for more information.
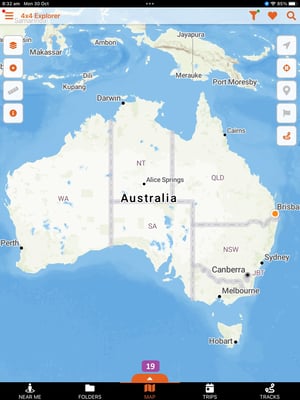
19 Hidden Status Bar
The Statistics panel appears along the bottom of the screen (whether in portrait or landscape mode).
You can toggle the display of the statistics panel by tapping the panel handle [15] at the bottom of the screen.
The Statistics panel displays 3 fields:
- Coordinates
- Altitude
- Current Speed
Zooming
The Hema 4x4 Explorer App has a number of new innovations in regards to how you interact with the map.
To enable these new features, please go to the App Settings menu and then turn on Enable Map tilt [1] and Enable Map rotation [2].
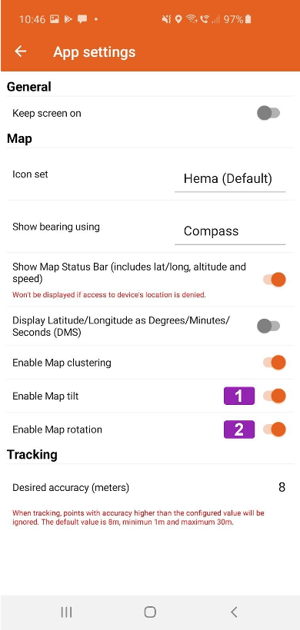
3D Map viewing / Map Tilt

Map Tilt allows a user to change their map viewpoint from an overhead look-down to a head on view. This gives you a dynamic map view of your surrounding area. To tilt the map into a dynamic view, place two fingers on the map screen and swipe towards the top of your device. To return to overhead view with your two fingers swipe towards the bottom of your screen.
360 Rotation
This let you rotate the map through 360 degrees to enable the view you would like.
You can rotate the Map using two fingers and moving them in a circular motion either clockwise or counterclockwise.
To reset the screen rotation back to normal click on the small compass icon in the top right.
Zoom Buttons
You can choose to enable zoom in and zoom out buttons on the main page of the 4x4 Explorer, You will need to activate this option.
Open the Menu in the top left and select app settings.
Open Map Settings and toggle Show Zoom Buttons to the on position
Useful Info
Here is some information which you may find useful while getting used to using the Hema 4x4 Explorer app.
Please note that all user guides etc. are constantly being updated. New versions are released as soon as they become available.
Hema Cloud
The Hema Maps Cloud is a useful addition to using the app.
You can find the cloud at the following URL:
When you first run the app on your device, you were prompted to create a user account. If you have a user account, you can log in to the cloud with that account. If you did not create an account, you can create one from within the app, or directly on the Cloud site itself.
Why would you want a Cloud account?
Why wouldn't you? It's free, and it extends the capabilities of the app. If you create a Cloud account, and sign into it in the app:
- All your data (waypoints, tracks, trips, etc.) are synced to the Cloud, so you have a backup of your data in case your device is lost or stolen.
- If you use multiple devices running Hema 4x4 Explorer, signed into the same Cloud account, your data syncs automatically between devices.
- You can share your own data with friends and family members, or make it public for the enjoyment or benefit of other folks, if you so desire.
Getting Help
Hema maintains a Tech Support website in an effort to answer questions and provide support for the use of our products.
The Tech Support website consists of the following:
Tech Support Knowledgebase
Our Knowledge Base consists of “ how-to articles” and aims to provide answers to many common questions. The Knowledgebase divides the articles into categories and provides a search facility to make finding the information you are looking for easier.
You can find the Tech Support Knowledgebase at the following URL: https://kb.hemamaps.com/
Tech Support Ticket System
The Tech Support Ticket System allows you to submit a query related to any of Hema's products.
When you submit a ticket, the system will automatically assign a case number to your query.
The Tech Support team will then do their best to assist you with the issue you are having via email responses.
You can find the Tech Support Ticket System at the following URL:
https://kb.hemamaps.com/kb-tickets/new
Tips for using the Tech Support Ticket System
- Please search the Knowledge Base before you submit a ticket. The answer to your query is often already answered within the Knowledgebase.
- If you do need to submit a ticket, please provide as much pertinent information related to the issue that you are having as possible. It makes it hard to assist if your ticket query is along the lines of "The app doesn't work".
Maps
Overview
This chapter of the User Guide is designed to introduce you to some of the concepts related to the use of maps within the Hema 4x4 Explorer app.
You do not need to become a map expert, but it helps to have some understanding to make your use of the app more enjoyable.
With typical mapping apps (such as Google Maps, etc.), a problem becomes apparent once you enter an area with limited or no internet connectivity. The issue is that without an internet connection, you can no longer "stream" new map information to your device, and you will have no mapping for those locations. Some apps allow you to cache (store) areas of maps for use when not connected to the internet. Some will have limits on how much data you can cache.
Warning
Be mindful of the size of some of the downloads in this app. Trying to download map layer data over an intermittent or poorly performing data connection will result in frustration, and possible failure of the download. Any large data downloads should be done while connected to a fast stable internet connection, for example, ADSL or cable via WiFi at home. Problems downloading data files are almost always caused by downloading over cellular (mobile) connections, poorly performing or incorrectly configured WiFi and Internet connections. It is not wise to attempt large downloads while on a cellular connection, unless you are certain that your mobile plan has a large download limit, or that you are not risking reaching your limit. Your ISP may charge for excess data consumed on your plan, and these charges can sometimes be excessive. It is your responsibility to monitor and manage your data on a mobile data plan.
Raster Maps vs Vector Maps
|
Raster Map |
Vector Map |
|
Raster or bitmap images are made of composed square pixels. |
Vector images are made of points that form lines and shapes dictated by mathematical formulas. |
|
The disadvantage over vector is that raster images are relying on their set image resolution. When zooming into a raster image the image gets blurry and pixelated. |
The advantage over raster is that graphics using a vector solution are always displayed crisp and sharp on any device's resolution. When zooming into a vector graphic the image is always nice and sharp. |
|
Depending on the image resolution raster images are bigger and take up more disk space. |
Vector graphics are smaller in file size and take up less disk space. |
|
Sample Raster image |
Sample Vector image |
|
|
|
|
The raster maps in the 4x4 Explorer app are images of selected Hema print products in a digital form. The POI and facilities are static and in the map file embedded. |
The vector maps in 4x4 Explorer are highly interactive maps. While zooming and panning the map content changes depending on the zoom level. The POI and facilities are interactive and 'floating' on the map - they can be rated and updated within the app. |


Map Packages
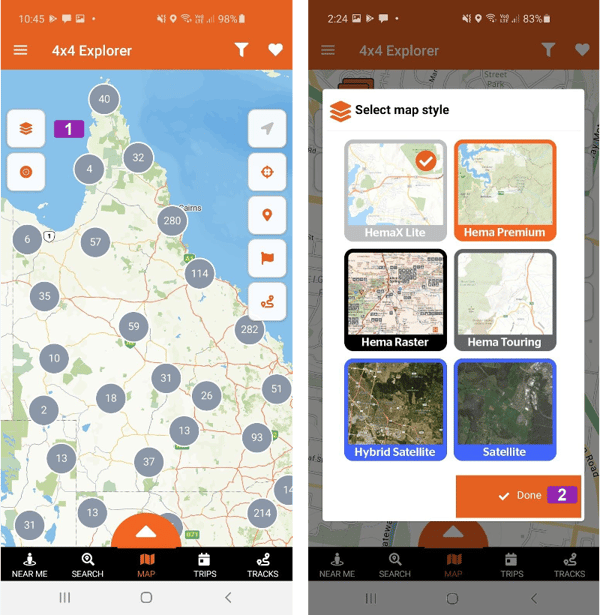
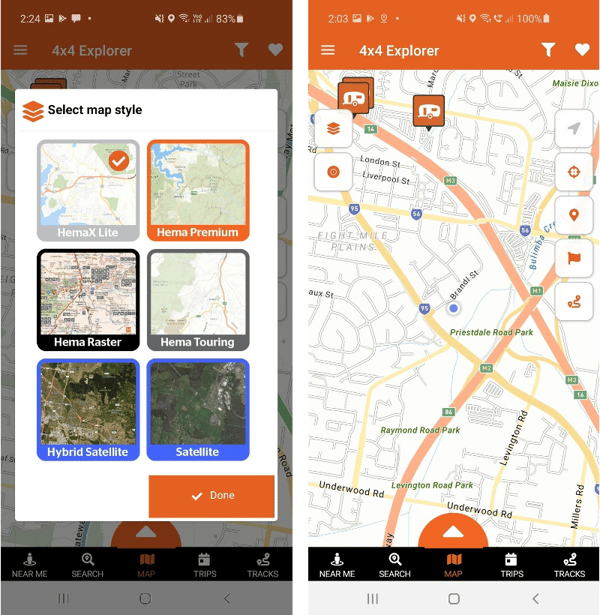
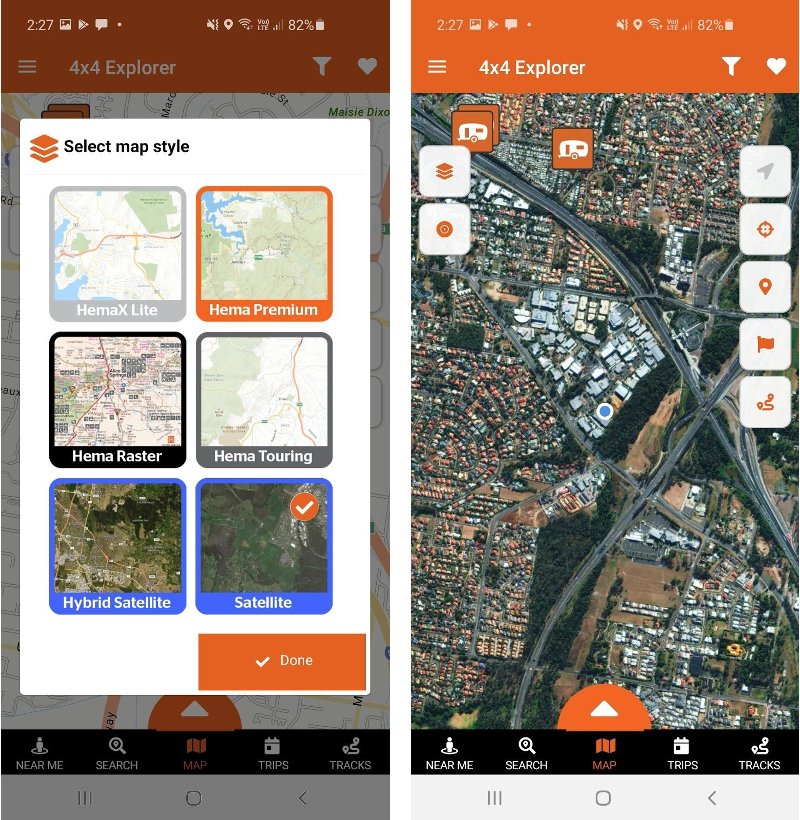
The mapping content that is displayed on the main screen of the Hema 4x4 app is set using the Map Styles menu. This is accessed from the Map Styles [1] button on the left hand side of the main map.
There are nine different styles that can be chosen.
Hema Premium
Hema Print
Hema Explorer
Topo Maps
OSM Onroad
Hema Touring
Satellite
Hybrid
Rooftop Maps
Meridian Maps
To apply the Map Style of your choice click on the Done [2] button.
Hema Premium
These are our premium set of Vector maps. They can be viewed online with the standard app. This map style can only be used offline with the Purchase of the Offline Premium Map Subscription.
Please note: Once you have activated the subscription you still need to download these maps so they can be used offline.
Please refer to the Downloading Map Packages section for instructions on how to complete these downloads.
Hema Print
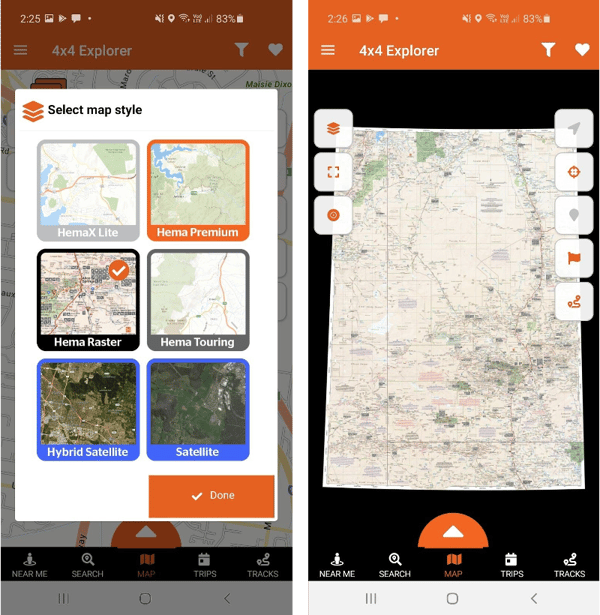
These are our Iconic Print Maps.. This map style can only be used with the Purchase of the Hema Print Map subscription.
When you choose to Hema Print from the Map Styles, you will then be asked which map to load. Click on the map you wish to load [3] and then click Done [4] to load the map. The map will then be displayed.
Please note: Once you have activated the subscription you still need to download these maps so they can be used offline.
Please refer to the Downloading Map Packages section for instructions on how to complete these downloads.
Hema Explorer
This is our iconic Australia wide seamless 1:150K map from the Explorer App. This is only available with a data connection.
Topo Maps
These are a selection of topographic maps from State Governments and other sources.
When you choose to Hema Print from the Map Styles, you will then be asked which map to load. Click on the map you wish to load [5] and then click Done [6] to load the map. The map will then be displayed.
These maps are only available with a data connection.
OSM Onroad
These are the standard offline mapping for the Hema 4x4 Explorer app.
Hema Touring

This is a specific set of maps generated for touring. This map style uses the same data set as the Premium Vector maps but without some of the topographic detail. This map style can only be used offline with the Purchase of the Offline Premium Map Subscription.
Please note: Once you have activated the subscription you still need to download these maps so they can be used offline.
Please refer to the Downloading Map Packages section for instructions on how to complete these downloads.
Hybrid Satellite
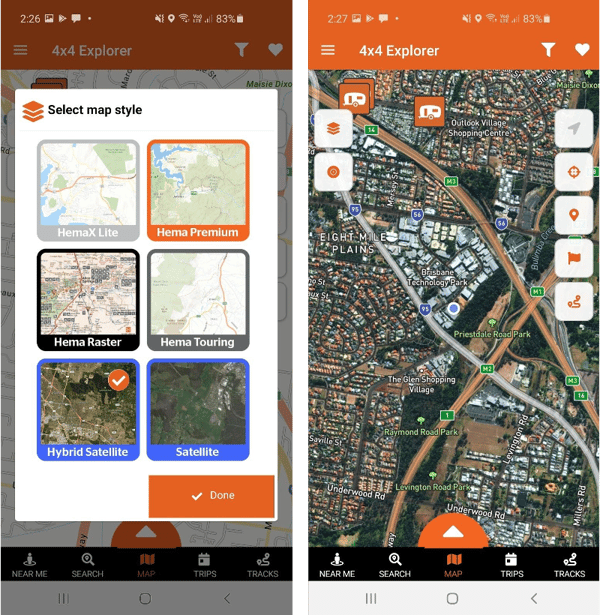
This is a combination of the 4x4 Explorer Points of interest and the satellite data
This is only available with a data connection.
Satellite
This is a Satellite map overlay.
This is only available with a data connection..
Rooftop Maps
Rooftop have created a series of maps specialising in hiking, dirt bike riding and 4WD. This map style can only be used with the Purchase of the Australian Maps - Rooftop Map Series.
When you choose Rooftop from the Map Styles, you will then be asked which map to load. Click on the map you wish to load and then click Done to load the map. The map will then be displayed.
Please note: Once you have activated the subscription you still need to download these maps so they can be used offline.
Please refer to the Downloading Map Packages section for instructions on how to complete these downloads.
Meridian Maps
Meridian Maps award winning recreational and wall maps are ideal for bushwalking, four-wheel driving, general travel and business use. Designed to be informative, comprehensive and easy to read, the maps will help guide you to some of Australia’s most interesting landscapes.
This map style can only be used with the Purchase of the Australian Maps - Meridian Maps Series.
When you choose Meridian from the Map Styles, you will then be asked which map to load. Click on the map you wish to load and then click Done to load the map. The map will then be displayed.
Please note: Once you have activated the subscription you still need to download these maps so they can be used offline.
Please refer to the Downloading Map Packages section for instructions on how to complete these downloads.
Downloading Map Packages
To enable offline use of the map packages in this app, you will need to download the map packages.
Warning!
Be mindful of the size of some of the downloads in this app. Trying to download map layer data over an intermittent or poorly performing data connection will result in frustration, and possible failure of the download. Any large data downloads should be done while connected to a fast stable internet connection, for example, ADSL or cable via WiFi at home. Problems downloading data files are almost always caused by downloading over cellular (mobile) connections, poorly performing or incorrectly configured WiFi and Internet connections. It is not wise to attempt large downloads while on a cellular connection, unless you are certain that your mobile plan has a large download limit, or that you are not risking reaching your limit. Your ISP may charge for excess data consumed on your plan, and these charges can sometimes be excessive. It is your responsibility to monitor and manage your data on a mobile data plan.
To download the map packages for the Hema Premium and Hema Touring please follow the steps below.
Step 1:
Click on the Main Menu [1] icon in the top left hand corner of the screen.
Step 2:
When the Main Menu opens please click on Map Subscriptions [2].
Step 3:
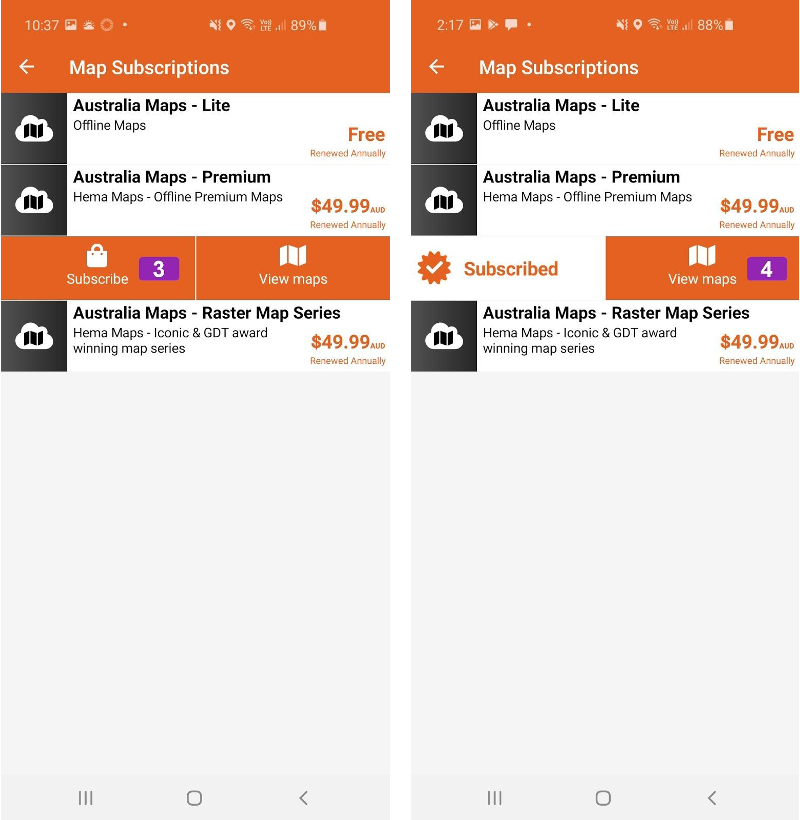
From the Map Subscription page, click on the map package you like to download. If you have not subscribed you will need to purchase the subscription, please click Subscribe [3] and follow the prompts to do this.
Step 4:
Once you have an active subscription then click View Maps [4].
Step 5:
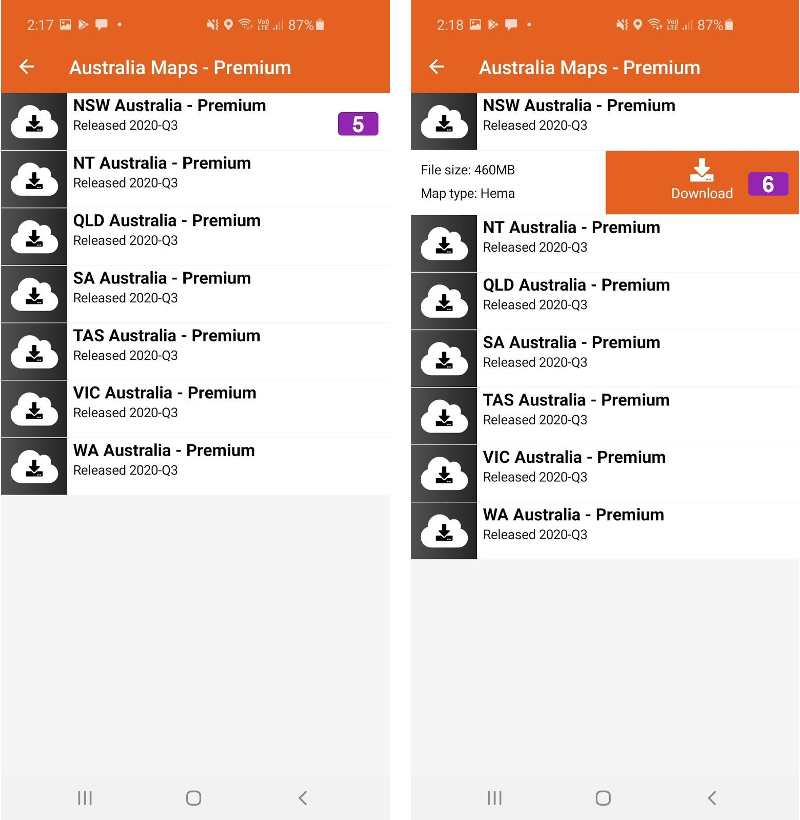
Before you can use these maps offline you will need to download them. All the maps that need to be downloaded will have a Cloud icon with a download arrow. To download each of the map sections click on the Map Title [5].
Step 6:
From the drop down banner click on Download [6].
Step 7:
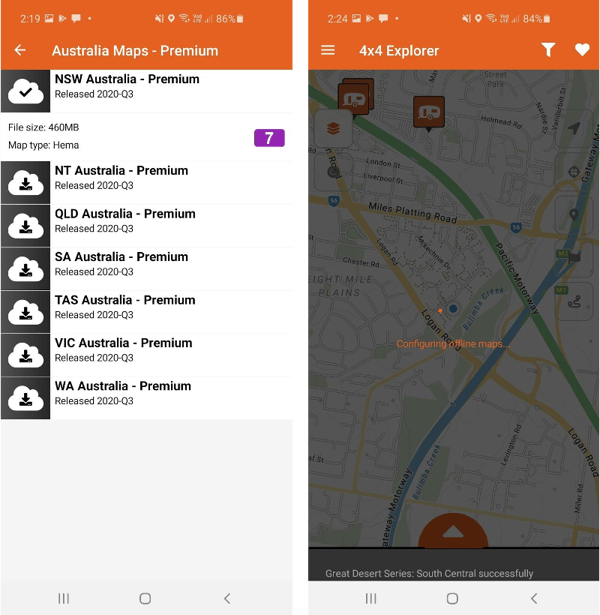
When each of the maps have finished downloading the icon will change to a Cloud with a Tick in it [7] and also show the size of the download.
Step 8:
When you go back to the main map the App will go through a short configuration so that your downloaded content is ready for use offline.
Main Menu
The main menu button is located in the top left hand corner of the screen [1].
The Main Menu is broken up into the following sections:
Account
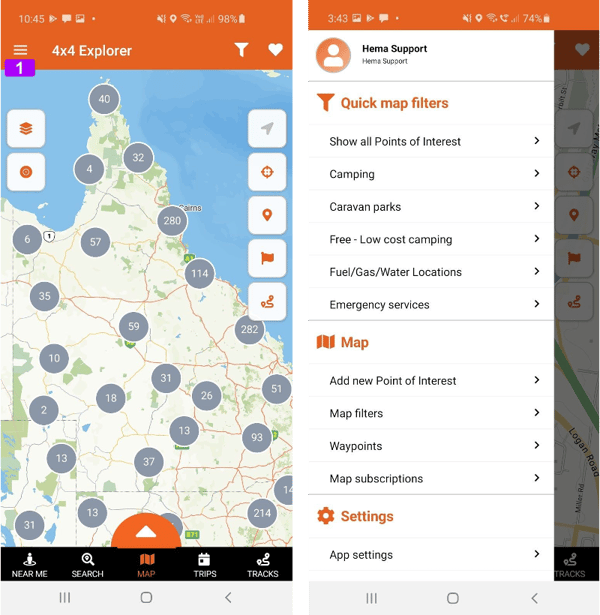
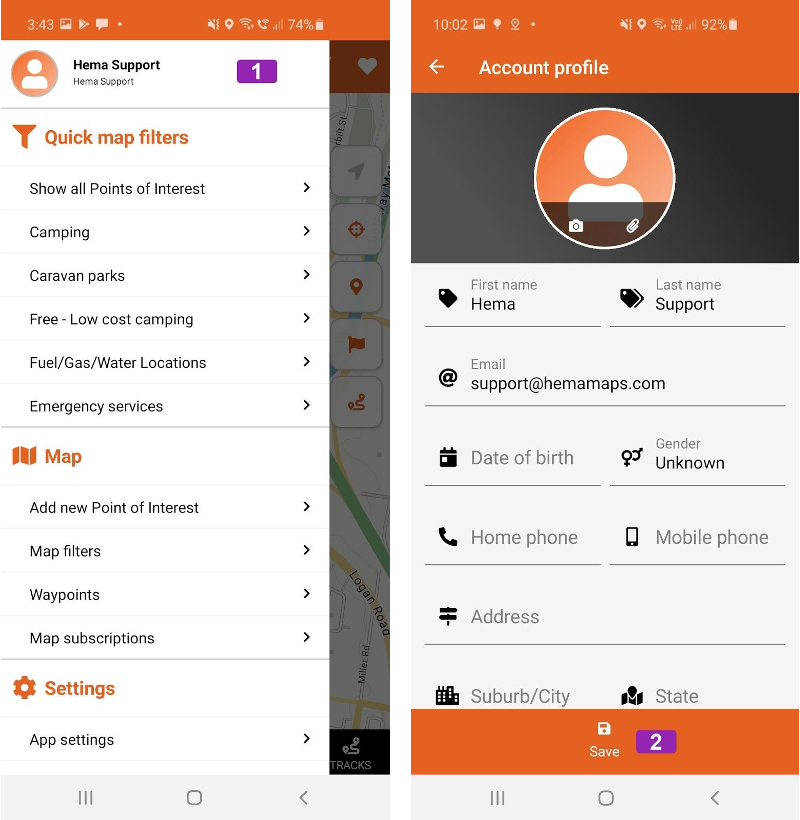 At the top of the Main Menu you will find your Account Details [1]. If you click on this section the Account profile page will load.
On this page you will find all your Hema Cloud account details.
You can add / edit of the details in this section, just remember to Save [2] and changes you have made.
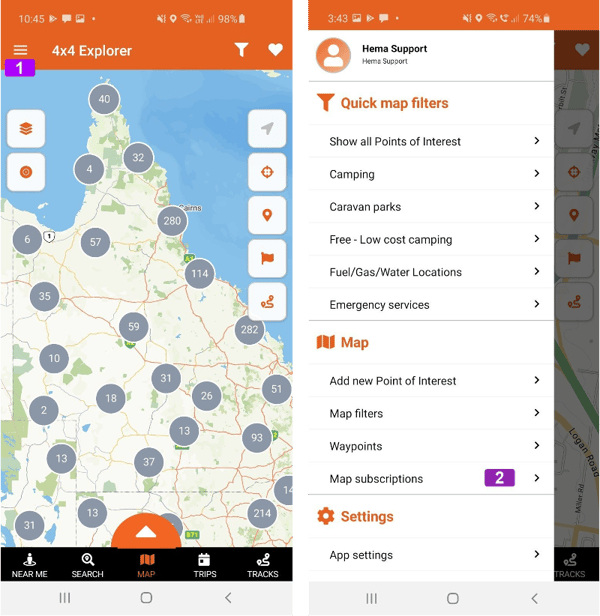
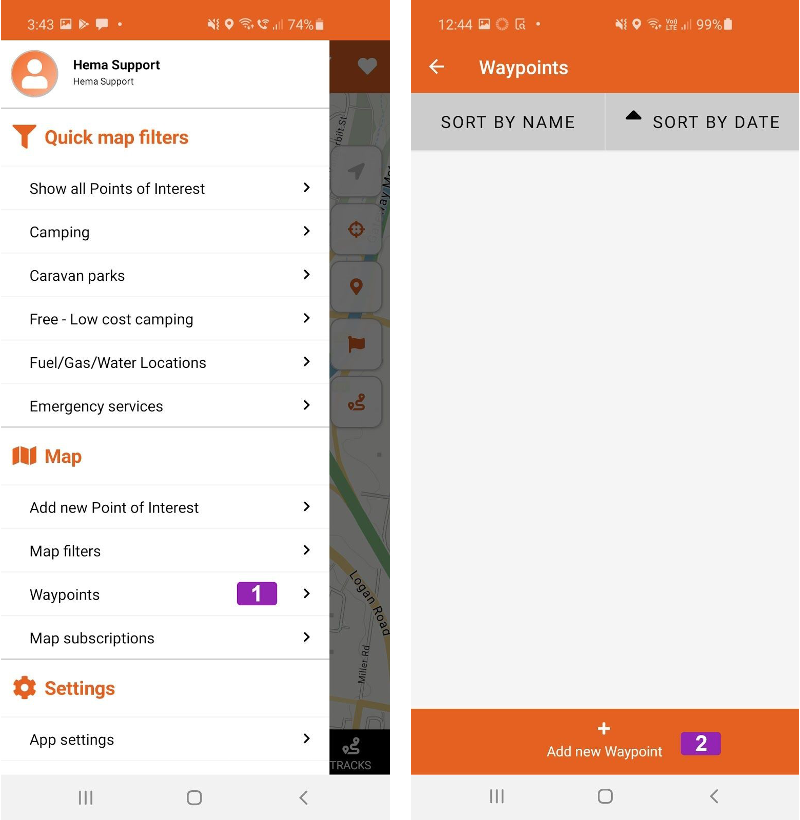
Quick Map Filters
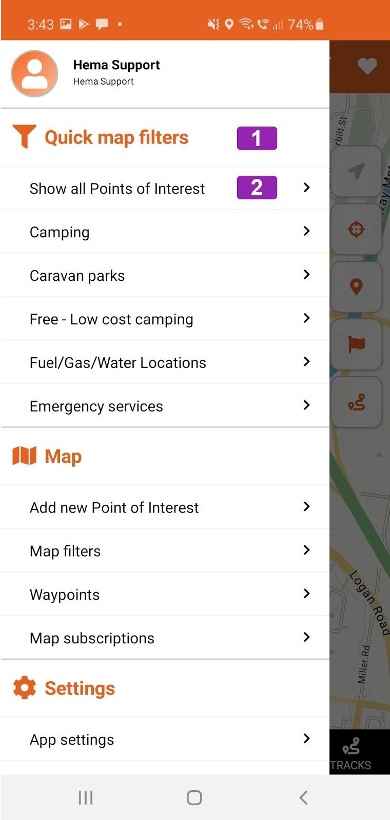
Under the Quick map filers [1] heading you will see the quick filters that can be applied to filter the points of interest on the map.
If you click on the respective categories listed below it will filter what Points of Interest are displayed on the main map.
Show all Points of Interest
Camping
Caravan Parks
Free - Low cost camping
Fuel/Gas/Water Locations
Emergency services
The option to Show all Points of Interest [2] will do exactly that and reset the filters.
Map

The Map [1] section of the main menu allows you to add a new point of interest, select Map filters, manage and add new Waypoints and manage your Map Subscriptions.
Submit a Point of Interest
You can Submit a Point of Interest [1] for review by clicking on this heading.
For more information on submitting a point of 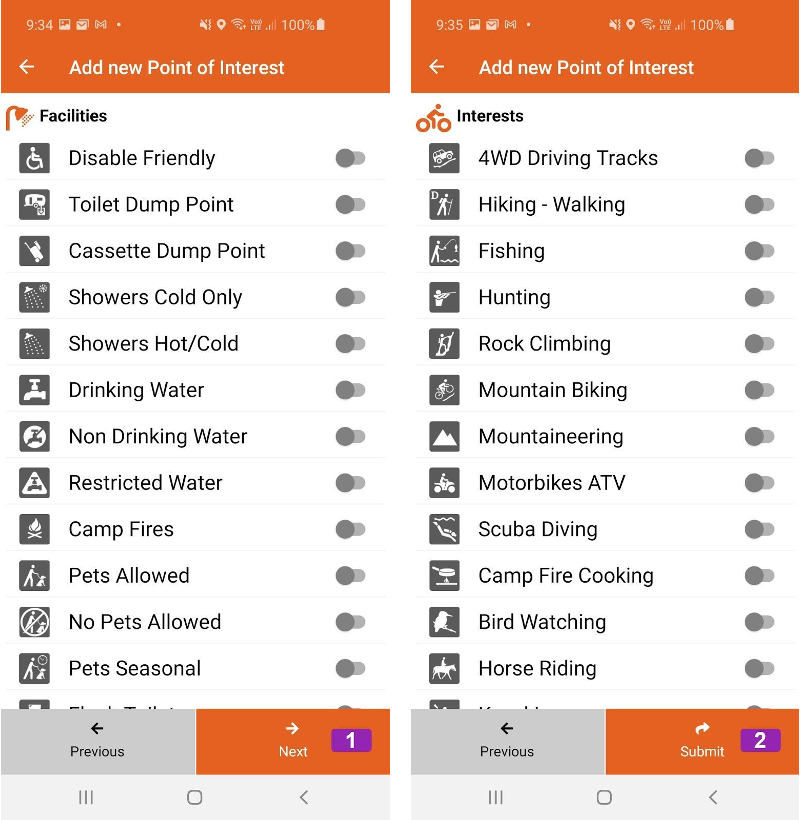 interest please see the Points of Interest section.
 Map Filters
Like the Map Filters icon at the top of the Main Map, clicking on the Map filters [2] heading will load the Map filters page.
For more information on the Map Filters please see the Map Filters section.
My Points of Interest
You can create a personal Point of Interest by clicking on the My Points of Interest [3] heading.
For more information on personal points of interest please see the Points of Interest section.
Waypoints
Clicking on the Waypoints [4] heading will load the Waypoints page.
For more information on creating waypoints please see the Waypoints section.
Import GPX
Clicking on the Import GPX [5] heading will allow you to import a GPX file into the App.
For more information on importing GPX files please see the Import GPX section.
Map Subscriptions
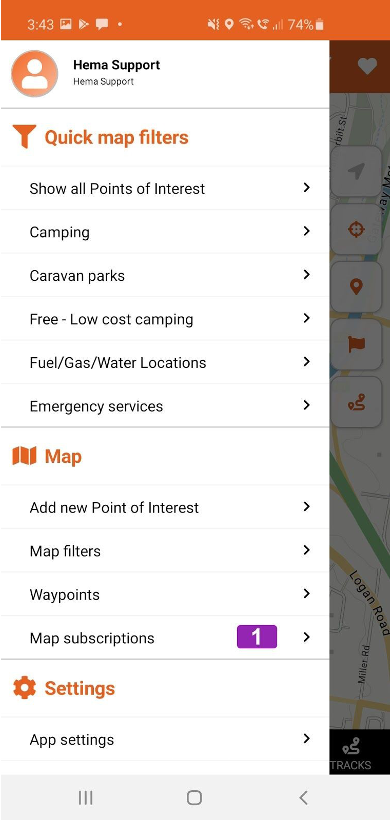 Clicking on the Map Subscriptions [6] heading will load the Map subscriptions page. From this page you can manage your Map Subscriptions.
For more information on Map Subscriptions please see the Downloading Map Packages section.
Settings
 App Settings
Clicking on the App settings [1] heading will open the App settings page. From this page you can view the main settings for the app and make changes as necessary.
For more information on the App settings please see the App Settings section.
Data-Sync
 Clicking on the Data-Sync [2] heading will open the Data-Sync page. This page lets you keep your app synced to the Hema Cloud.
For more information on the App settings please see the Data Sync section.
My location
 Clicking on the My location [3] heading will open the My location page. This panel lets you see your current GPS Coordinates, Location and What3Words location.
For more information on the App settings please see the My location section.
About - Help
 Clicking on the About - Help [4] heading will open the About - Help page. This page shows you information about the app including the version number and also has links to contact us.
Tutorial
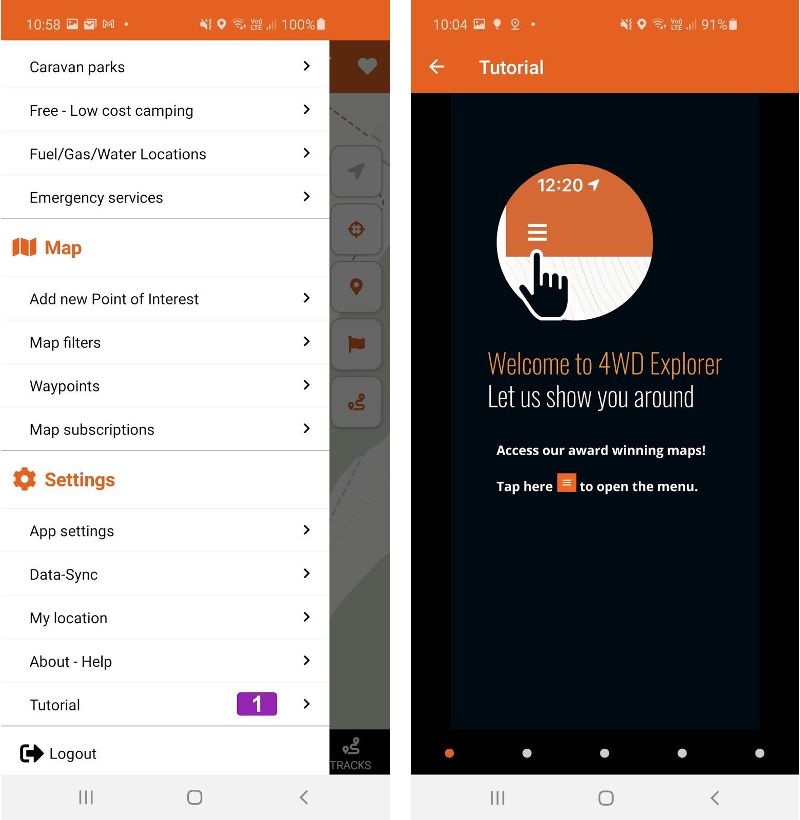 Clicking on the Tutorial [5] heading will open the Tutorial page. This page shows you some hints and tips to better acquaint you with the app. You can swipe through the tips or click the dots at the bottom of the page to navigate it.
Logout
 Clicking on the Logout [6] heading will log you out of the App and take you back to the sign in page..
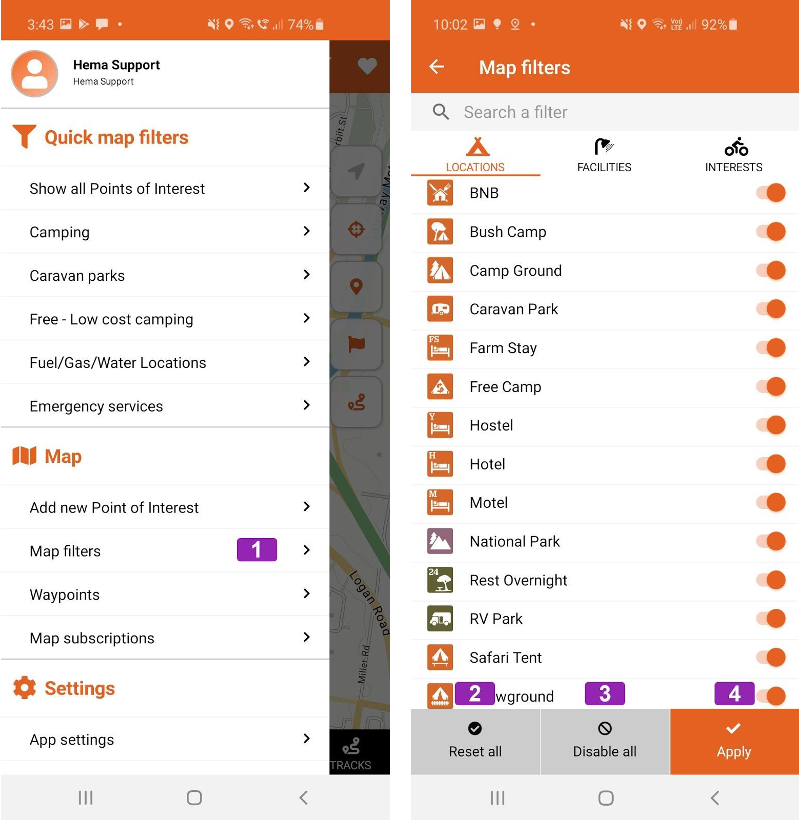
Map Filters

The Map Filters can either be accessed from the main map or the main menu.
To access the map filters from the main map, click on the Map Filters [1] icon in the top right hand corner.
To access the map filters from the main menu, firstly open the main menu and then click on the Map Filters [2] heading.
The Map Filter page will allow you to turn Point of Interest sets on / off. To enable or disable the filters simply click on the toggle to the right of the filter to change the status..
At The bottom of the panel you can Reset All filters [3], Disable All filters [4] and then Apply [5] the filters you have activated.
Map Filters is split into 3 categories, Locations Facilities and Interests,
Locations
Locations are the main categories of POIs you can toggle a category on and off to choose which POIs are displayed on the map, You can have as many Locations turned on as you wish, but you must always have one selected
Facilities and Interests
Facilities Filters are applied as a “must Have” For example if you choose BBQ and Boat Ramp the map will only show Points of Interests that have both of these facilities and Interests.
Favourites
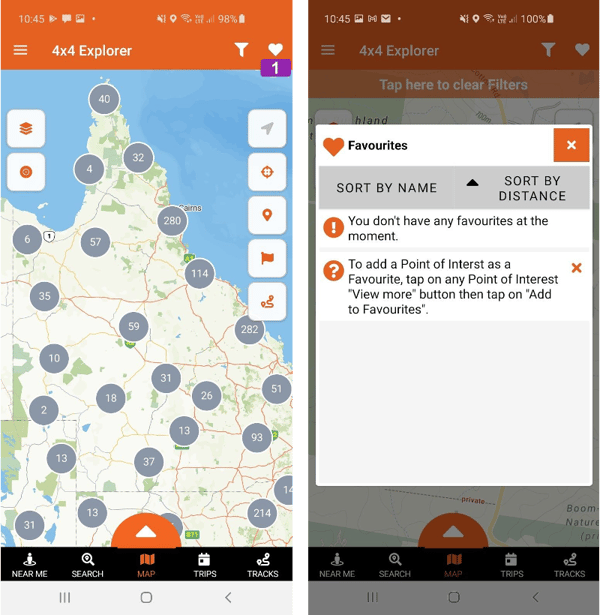
Clicking on the Favourites [1] icon in the top right of the screen will open the Favourites page.
From this page you can see any points of interest you have favourited.
Adding a Favourite Point of Interest
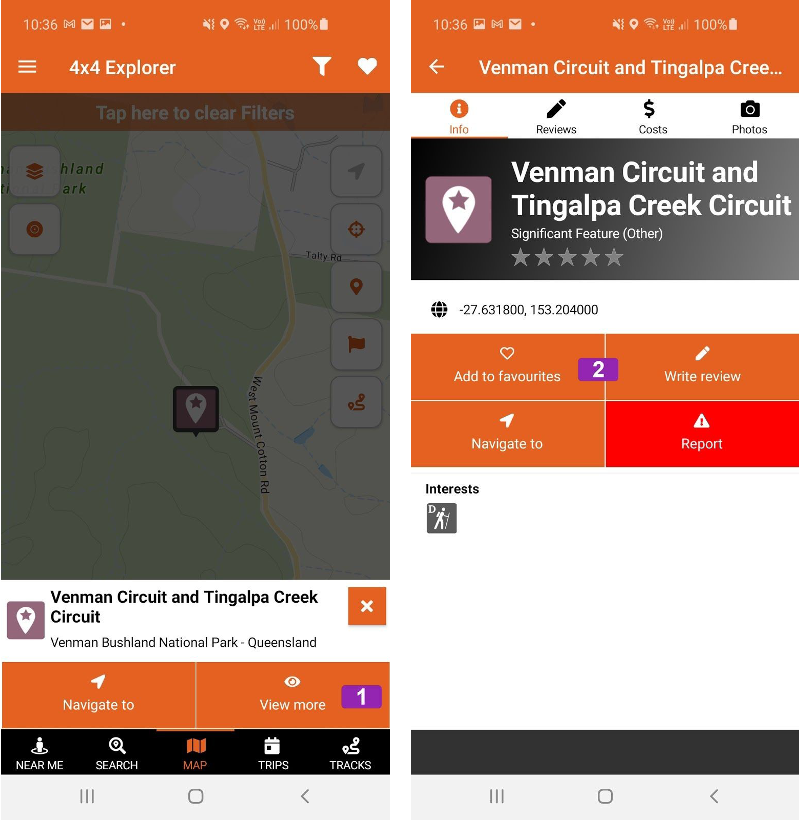
To make a point of interest a favourite, click on the point of interest, then click View More [1].
The Point of Interest information screen will then load and you can then click Add to favourites [2].
You can also Write a review, Navigate to and Report and errors in the Point of Interest from this screen.
Once you have added the point of interest to your Favourites, it will appear in the Favourites panel.
If you select the Point of interest you can then choose to:
View on map
This will show the point of interest on the map
Navigate to
This will navigate you to the selected point of interest. Please note that 4x4 Explorer App does not have a turn by turn routing engine so your mapping app on your device will open and navigate you to the location.
View More
This will take you to the point of interest information page.
Delete
This will remove the point of interest from your favourites list.
Measuring tool
The Measuring tool can be used to either measure the distance from your current location to another location or from one location to another. Please note: the Measuring tool only measures as the crow flies from point to point and does not map to tracks or roads. The tool is only a guide and should only be used as such.
To activate the Measuring tool, click on the Measuring tool icon on the left hand side of the main map. The icon will turn orange to indicate the measuring tool is activated.
To measure the distance from your current location to another point, click anywhere on the main map and the App will then measure the distance to that point from your current GPS location and display it at the top of the screen.
You can also measure the distance between two points when one is not your current GPS location. Firstly tap the first point on the screen that you wish to measure from. Then long press the second point on the main map and the App will then measure the distance between the two points and display it at the top of the screen.
You can disable the measuring tool by click on the Measuring tool icon.
Points of Interest
Submit a Point of Interest
You can Submit a Point of Interest for review by clicking on this heading. The HemaX team will review the Point of Interest and add it once it has been verified.
Once you have clicked on the heading the Add new Point of Interest page will load. To add a new point of interest to the Hema Cloud database, fill in the information in this panel as seen to the left and then click Next.
Once you have clicked Next, you will then be asked to add what Facilities the new Point of interest has. To add a facility simply toggle the on / off state on the right of the facility.
When you have added all the facilities click Next.
Once you have clicked Next, you will then be asked to add what Interests the new Point of interest has. To add an interest simply toggle the on / off state on the right of the facility.
When you have added all the interests click Submit and your new Point of interest will be submitted for review. Click OK to complete adding your point of interest.
My Points of Interest
Adding a Personal Point of Interest
There are two ways in which you can add a new Personal Point of Interest.
The first way is from the My Points of Interest heading in the Main Menu.
You can create a personal Point of Interest by clicking on the My Points of Interest heading.
Once you have clicked on the heading the My Points of Interest page will load. To add a new personal point of interest, click on the + Add New, fill in the information in this panel as seen to the left and then click Next.
Once you have clicked Next, you will then be asked to add what Facilities the new Point of interest has. To add a facility simply toggle the on / off state on the right of the facility.
When you have added all the facilities click Next.
Once you have clicked Next, you will then be asked to add what Interests the new Point of interest has. To add an interest simply toggle the on / off state on the right of the facility.
When you have added all the interests click Save and your new Point of interest will be saved. Once your new point of interest has been saved, it will then appear in the My Points of Interest page.
The second way is from the Main Map. To add a personal point of interest from the Main Map, all you need to do is click and hold on the Main Map where you want the waypoint to be added.
Then from the popup box chose My Point of Interest.
You will then be guided through the same process as above when adding from the Main Menu. When you have finished, click Save. Once your new point of interest has been saved, it will then appear in the My Points of Interest page.
Deleting a Personal Point of Interest
Once your new point of interest appears in the My Points of Interest page you can then select it and you will be given 5 options from the drop down panels.
View on map
This will show your personal point of interest on the map.
Navigate to
This will open your personal point of interest in your navigation program of choice.
View More
This will show more detailed information about your personal point of interest.
Edit
This will let you edit the details of your personal point of interest.
Delete
This will let you delete your personal point of interest.
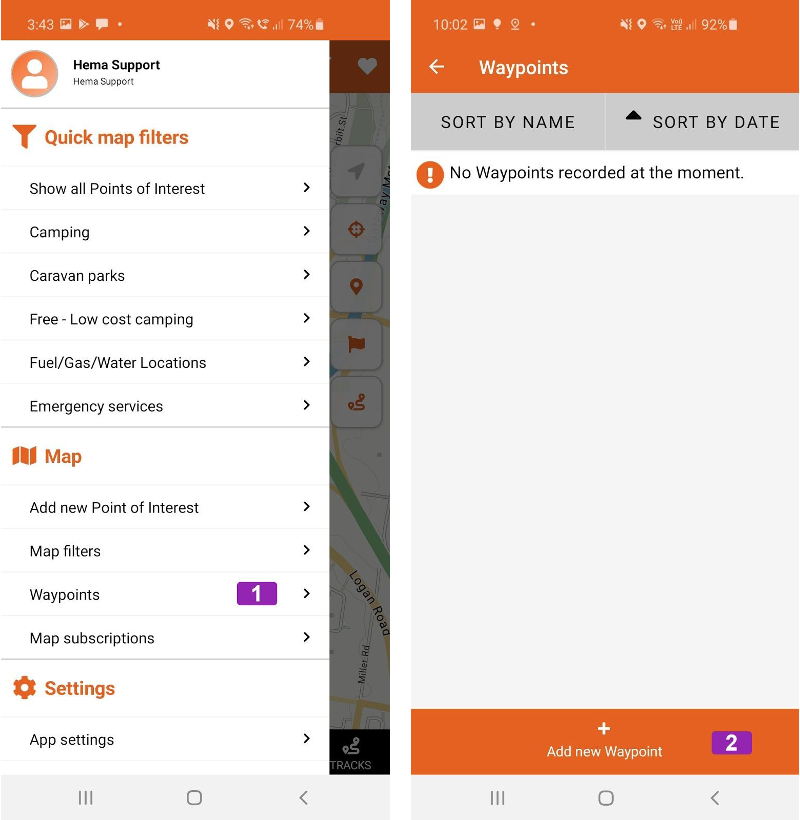
Waypoints
Adding a Waypoint
There are two ways in which you can add a new Waypoint.
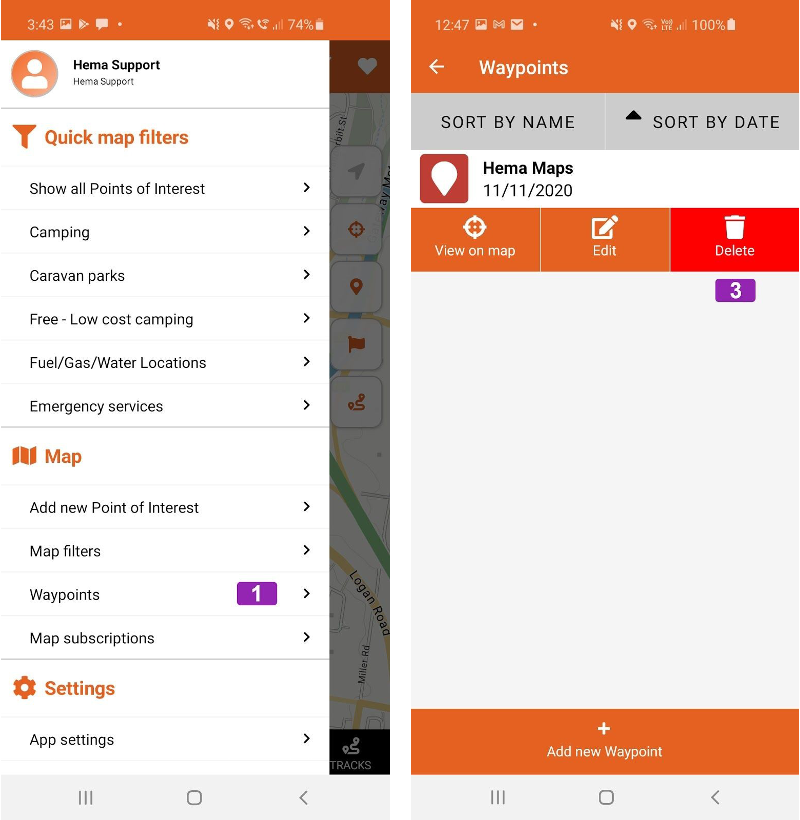
The first way is from the Waypoint heading in the Main Menu.
After you click on the Waypoints Heading [1] the waypoints page will load.
From the Waypoint page click on + Add new Waypoint [2] from the bottom banner.
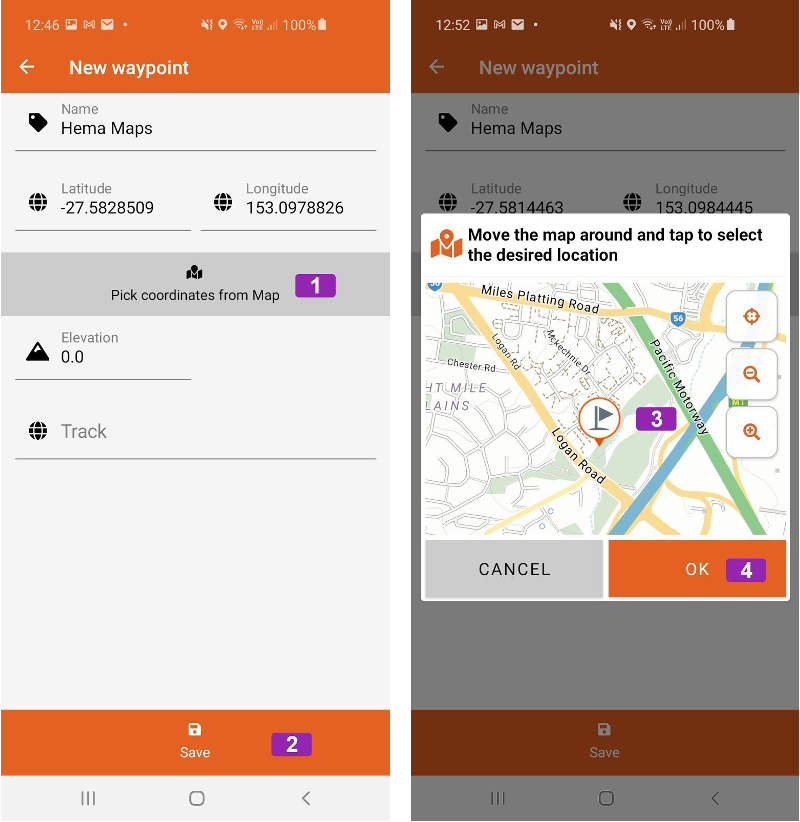 The New waypoint page will then open. From here you can give the waypoint a name, you can also enter the coordinates if you know them, or alternatively you can click on the Pick coordinates from Map [3] banner.
When you click on the Pick coordinates from Map banner a popup up screen will appear and you can select the desired location for your waypoint by moving the Flag icon [4] around
When you are satisfied that the Flag icon is in the correct place, click OK [5].
When you want to finish adding your new waypoint click Save [6].
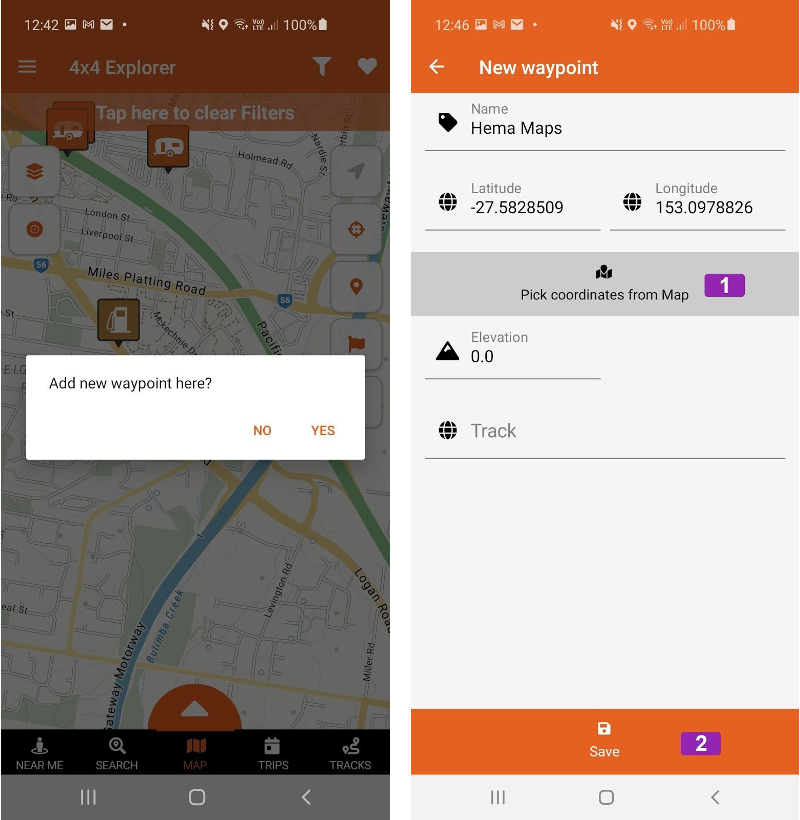 The second way is from the Main Map. If you want to add a waypoint from the Main Map, all you need to do is click and hold on the Main Map where you want the waypoint to be added. From the popup box please select Waypoint [7].
When you select Yes, the New waypoint page will then open. From here you can give the waypoint a name, you can also enter the coordinates if you know them, or alternatively you can click on the Pick coordinates from Map banner as per the instructions above.
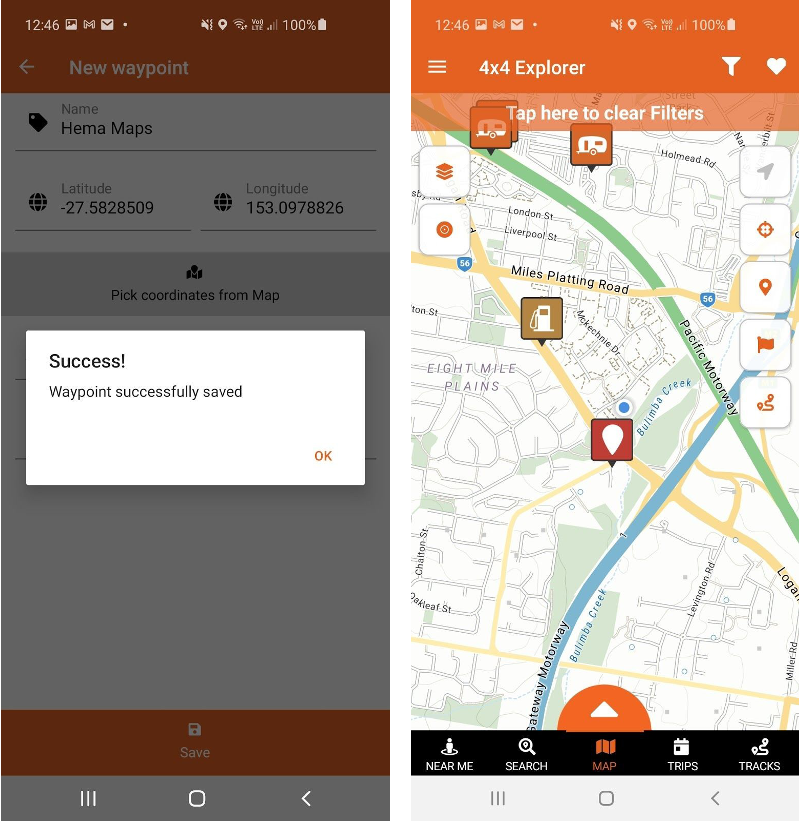 When you click Save in the bottom panel, you will be notified that the process was successful.
You will then see the waypoint display on the map
Navigating to a Waypoint
To navigate to a waypoint all you need to do is click and select the waypoint you wish to navigate to. From the banner on the bottom of the screen. click on Navigate to and your selected turn by turn navigation app will load and navigate you to the selected waypoint . Please note that 4x4 Explore does not have a turn by turn routing engine so your mapping app on your device will open and navigate you to the location.
Editing a Waypoint
To edit a waypoint you will need to first open the Waypoints page from the Main Menu.
When you select the waypoint you want to edit you will get 4 options.
You can either;
View on map
Edit
Export to GPX
Delete
When you click on Edit the waypoint information will load and then you can make any changes you want and then click Save in the bottom banner to confirm those changes.
Exporting a Waypoint
To export a waypoint you will need to first open the Waypoints page from the Main Menu.
When you select the waypoint you want to export you will get 4 options.
When you click on Export to GPX your waypoint will be exported and then you will be asked if you want to share the file. Click on YES to then select how you would like to share the file.
Deleting a Waypoint
 To remove a waypoint from your App you need to go into the main menu, then select Waypoints [1]. This will then load the Waypoints page.
The next step is to select the waypoint you wish to remove [2].
From the four options click on the Delete [3] banner you will be asked to confirm your action, please click YES to remove the waypoint.
Import GPX
To import a GPX file into the App, click on the Import GPX heading in the Main Menu.
From the Import GPX page click on Select File.
You will then be asked to select the file that you wish to import. Depending on your device and operating system these options may differ from the screenshots provided.
Once you have selected the file you would like to import, the file will be analysed to see if it is compatible. Once there is a tick next to File ready to import, click on the Import heading in the bottom banner.
To start the import of your GPX file, please click OK from the popup window.
When the file has been successfully imported you will get a notification, Click OK to close the notification window.
To see your imported file, click on Tracks in the bottom menu and you will see your track in the track list.
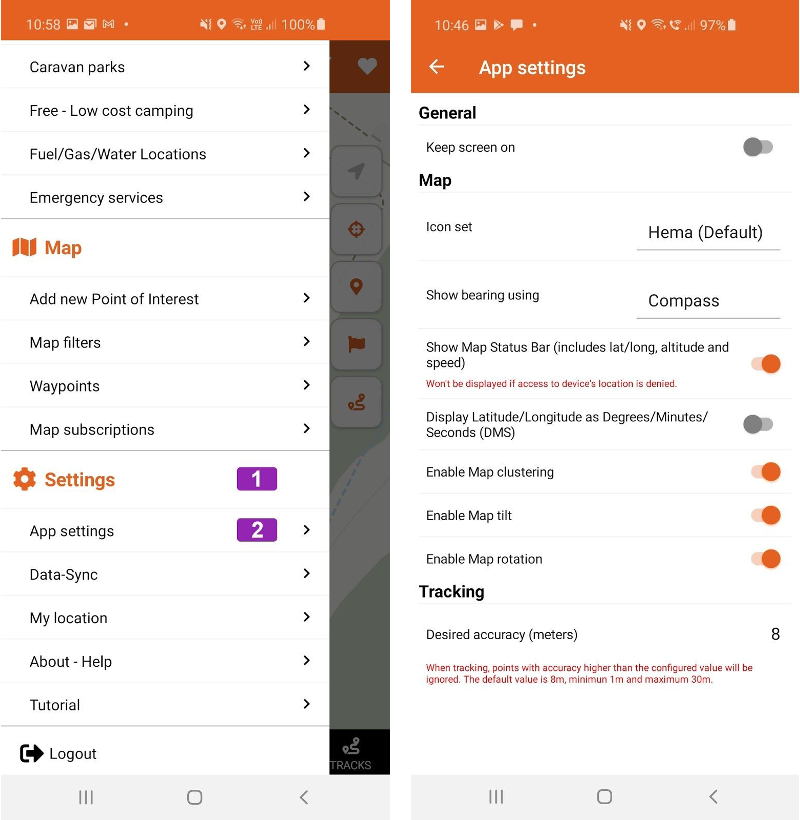
App Settings
The App Settings page is broken up into three main sections.
1 General
2 Map
3 Tracking
Click on the down arrow to the right of each of the headings will drop down further options.
General
In the General section of the App Settings you will find the options to:
Keep screen on
If you would like to keep the screen of your device on while using this app, click the switch to the right to enable. Currently shown in the off state.
Navigation bar colour
This lets you change the colour of the navigation bar.
Coordinate
This lets you change the format displayed for the coordinates on the app, your options here are
- Signed Degrees (SD)
- Decimal Degrees (DD)
- Degree Decimal Minute (DDM)
- Degree Minute Second (DMS)
- UTM
- MGRS
- Catersian
- ECEF
Delete My Data
This option allows you to wipe your personal information off the application. It will log you out of the application and wipe any data stored on the app. It will also uninstall any maps downloaded
It will not wipe data from your HemaX cloud account that has been backed up with a data sync,
Map
In the Map section of the App Settings you will find the options to:
Icon Set
This lets you choose between Hema (default) and HemaX icon styles.
Icon Size
This let you set the size of the icons, you can choose Small, Medium and Large.
Map scaling
This lets you adjust the size of the elements on the vector maps, such as label, streets and symbols.
Show bearing using
This lets you choose how the App determines your bearing.
Show Map Status Bar
This lets you show ro house the Map Status Bar
Auto hide map buttons
This sets the icons on the main page of the app to auto hide away during use so your map is not cluttered with icons
Show Zoom buttons
This lets you enable or disable the the zoom buttons on the main screen
Show scale bar
This lets you enable or disable the scale bar.
Enable Map clustering
This lets your enable or disable the clustering of the Points of Interest.
Enable Map tilt
This lets you enable or disable the map tilt.
Enable Map rotation
This lets you enable or disable the map rotation.
Clear offline maps
This let you clear any maps you have downloaded as part of a map subscription.
Tracking
In the Tracking section of the App Settings you will find the options to:
Track start type
This let you select what happens when you click the Record button on the main screen.
You can choose between
Quick start which will start recording straight away.
Ask me which will ask you if you would like to record a new track or use an existing track.
Desired accuracy (meters)
When tracking, the points with accuracy higher than the configured value will be ignored. This means that if the record point has a variance of 12m and the setting is 8m it will be ignored and not recorded. You can set this setting from 1m to 30m.
Track breadcrumbs (seconds)
This sets the interval in seconds for when the App records a track point.
Enable Live Tracking (In development)
This is a feature that is currently in the midst of development. Soon, you will be able to track the position of your devices through the cloud.
Live tracking interval (minutes)
This sets the interval for when the app will send your gps position to the cloud.
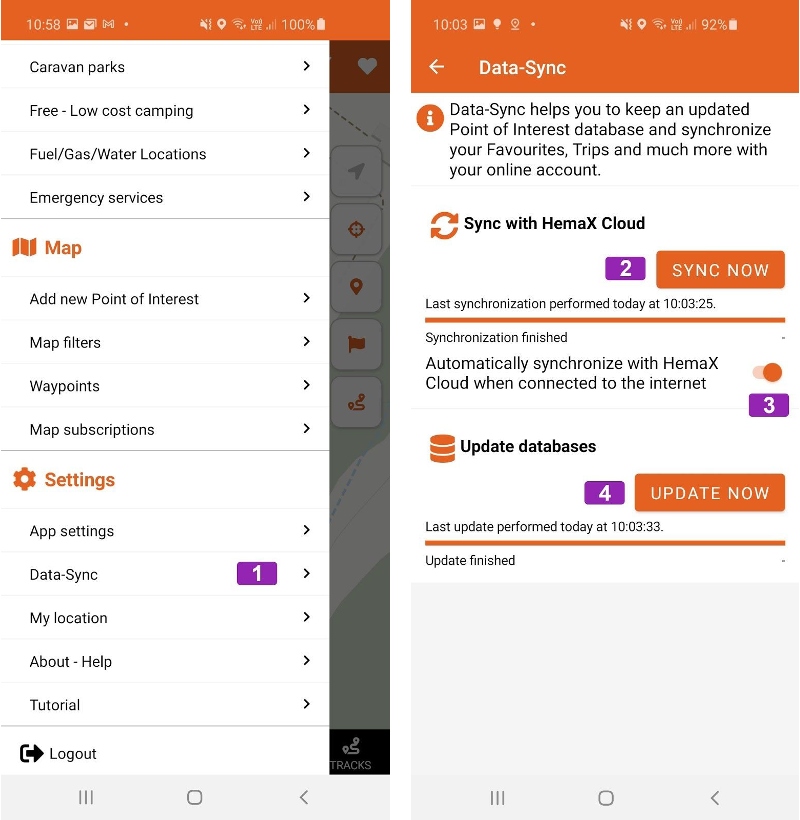
Data-Sync
 The Data Sync page lets you sync your App with the HemaX cloud.
To sync your App, click on the Sync Now [1] button. You can also automatically sync the unit by clicking icon [2] and enabling the option.
When the sync has been completed you will see a notification saying it has been completed and also a list of the completed activities [3].
From this Data Sync page you can also update the HemaX database. To update the database click on Update Now [4]. When the updates have been completed you will see the completed items below [5].
My location
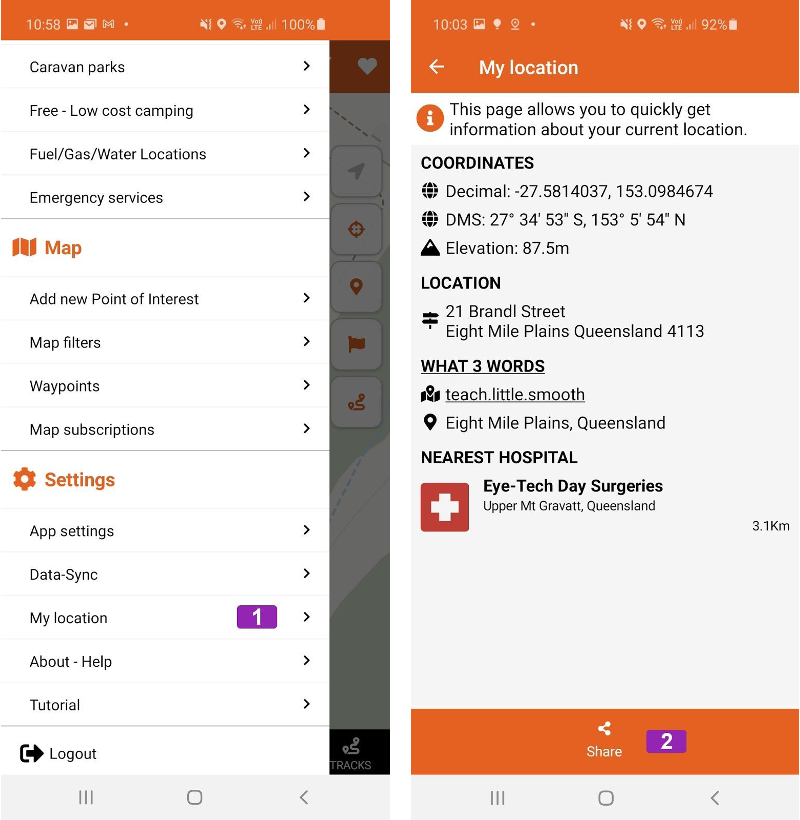 This panel lets you see your current GPS Coordinates, Location, What3Words location and Nearest Hospital.
This panel will also display your current time, sunrise and sunset time for your location.
What3words is a geocode system for the communication of locations with a resolution of three metres. What3words encodes geographic coordinates into three dictionary words; the encoding is permanently fixed.
For more information please visit https://what3words.com/
You can share your location by clicking the Share button in the bottom banner. When you click the Share button you will be asked how you would like to share your location.
Trips
This chapter of the user guide is focused on how to plan your next Trip using the Hema 4x4 Explorer app.
Creating a new trip
 To create a new trip, firstly click on the Trip [1] heading in the bottom planner menu.
This will open the Trip page. To start a new trip click on the + Start New Trip [2] banner on the bottom of the page.
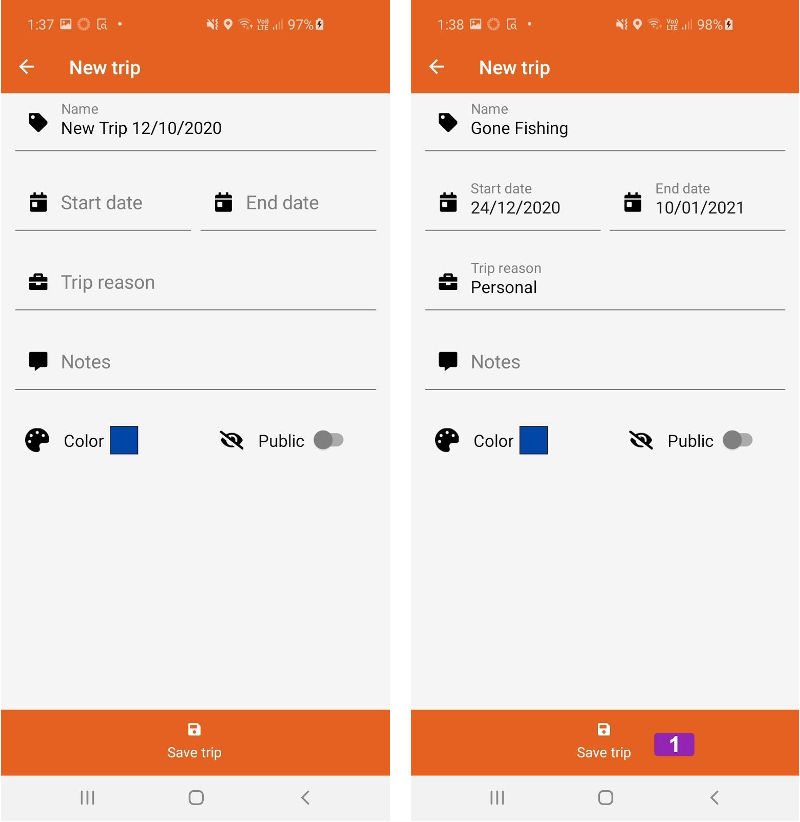 Please fill in any details that are relevant as above and then click Save Trip [1].
You will then return to the Trip section and you will see you trip there.
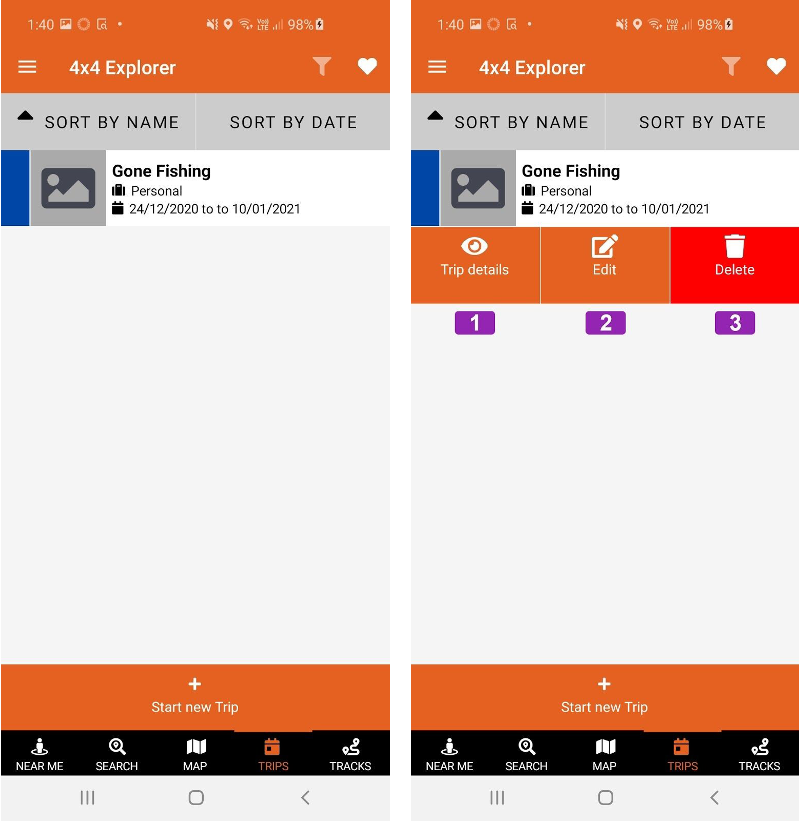 To start planning your trip click on the trip title and then click on Trip details [1] icon from the drop down banners.
You can also edit the Trip details at any time by clicking on the Edit [2] icon or delete the trip by clicking the Delete [3] icon.
Trip details
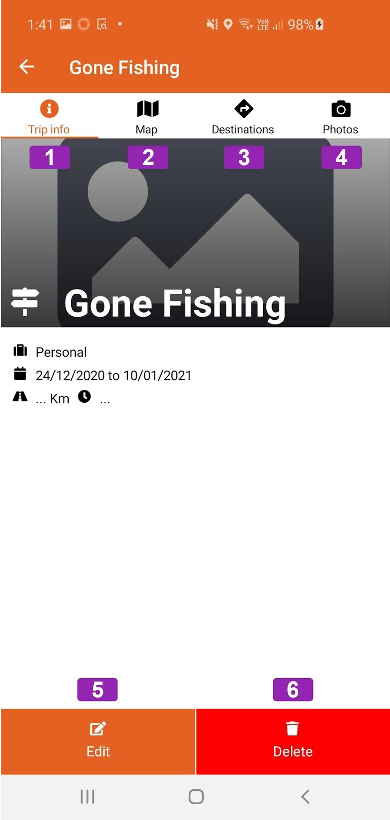
When the Trip details page loads you will see the trip name at the top of the page. Below that you will see the Trip Info [1], Map [2], Destinations [3] and Photos [4] icons.
Trip Info
This is where you can see a general overview of your trip.
Map
This is where you can access the main map and start planning your trip.
Destinations
This is where you can see a list of the destinations in your trip.
Photos
This is where you can see any photos associated with your trip.
You can also Edit [5] the trip details and Delete [6] the trip from this page as well.
Starting Point
New Destination
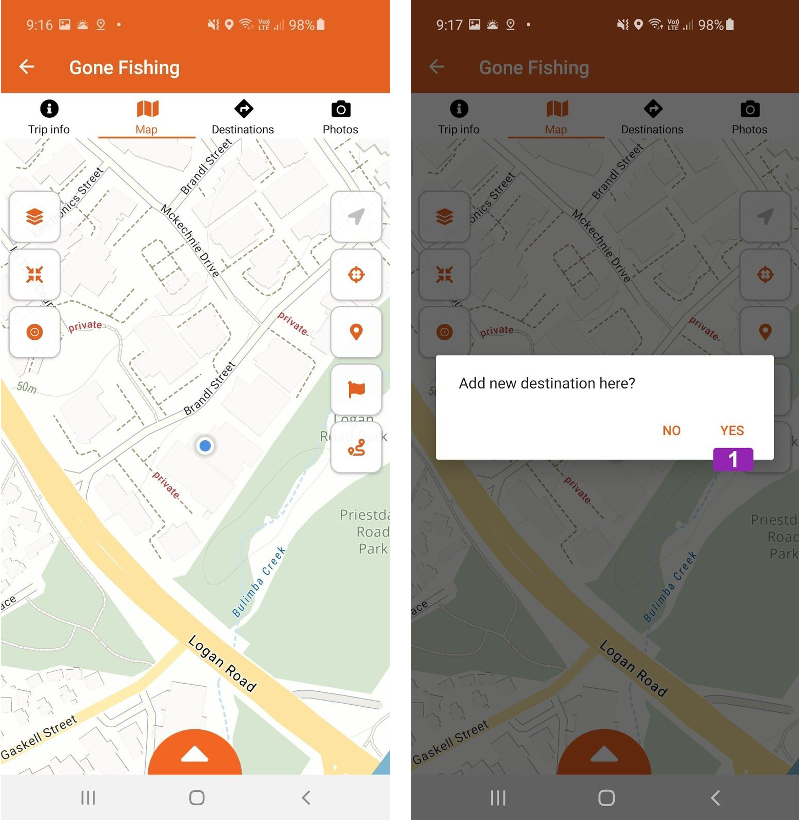
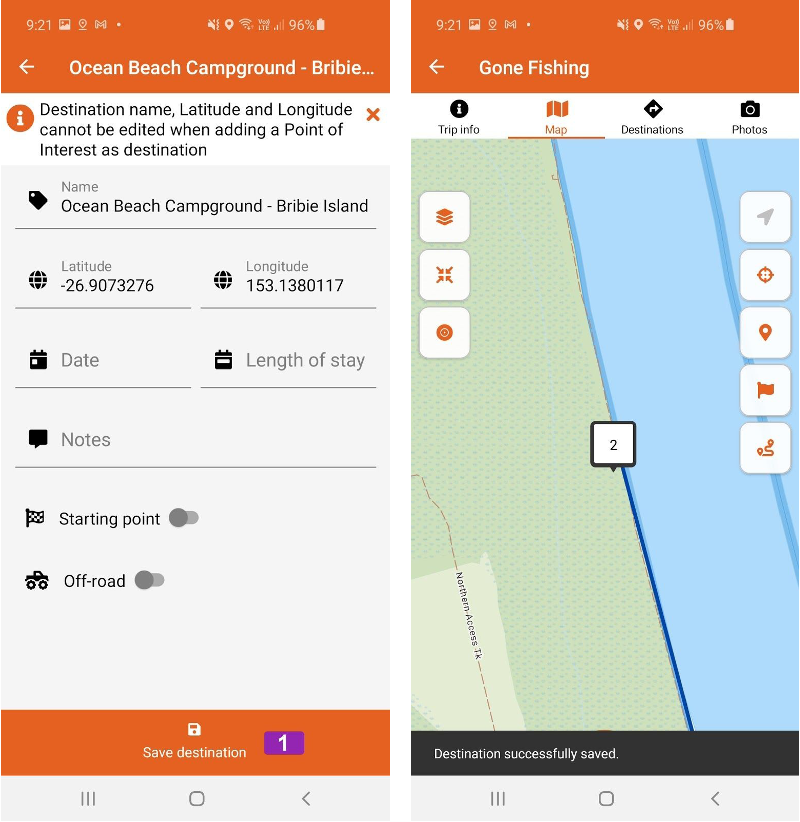
To choose a start location you can click and hold on the main map. Then select Yes [1] to add a new destination.
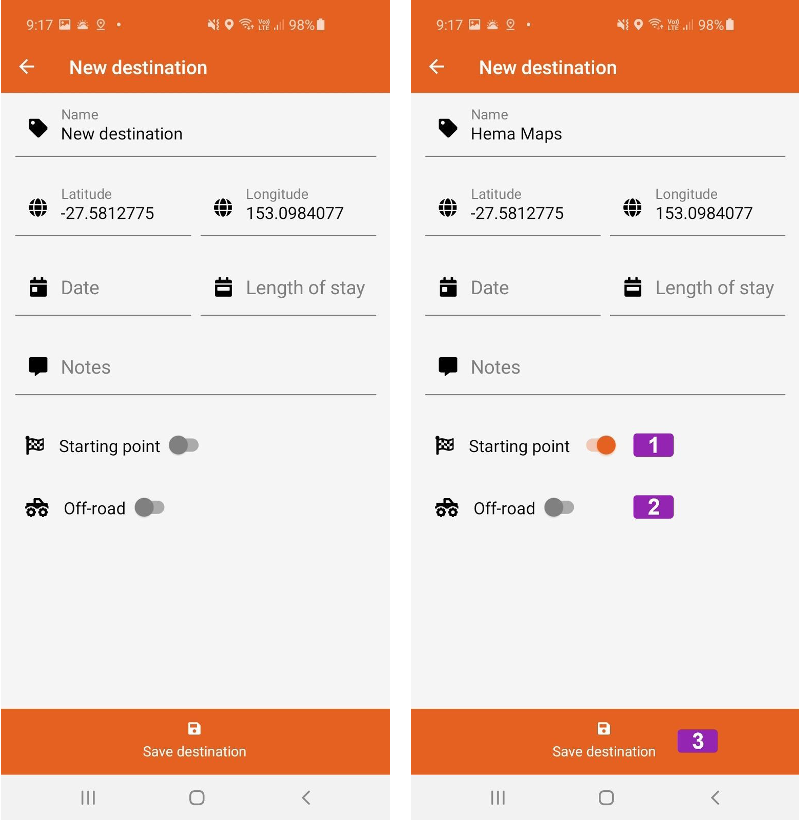 You can then add information about the start destination and then set it as the start destination [1].
If the destination you are trying to add is a remote location you may need to enable the Off-road function [2]. This will disable the auto generate feature and connect to this destination with a straight line.
When you completed the information click on the Save destination [3] banner at the bottom.
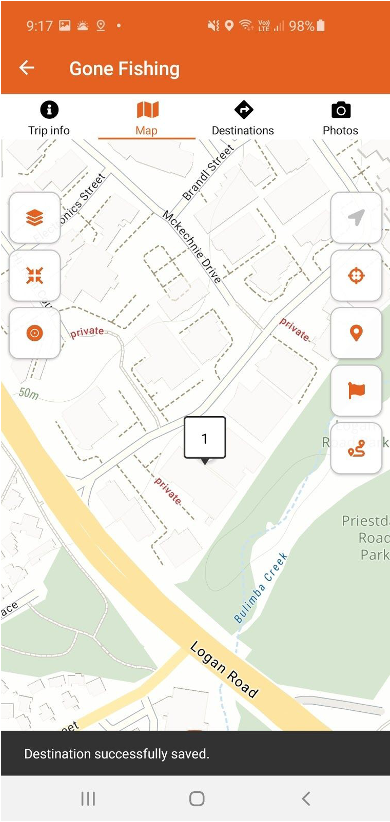 Once the Starting Point has been saved you will see a banner at the bottom of the screen to confirm this action.
You will also see that because it is the Starting Point it has the designation 1.
Point of interest
 You can also click on a point of Interest and use that as the starting point. Just click on the POI [1] icon and then from the information panel at the bottom click on + Add to trip [2].
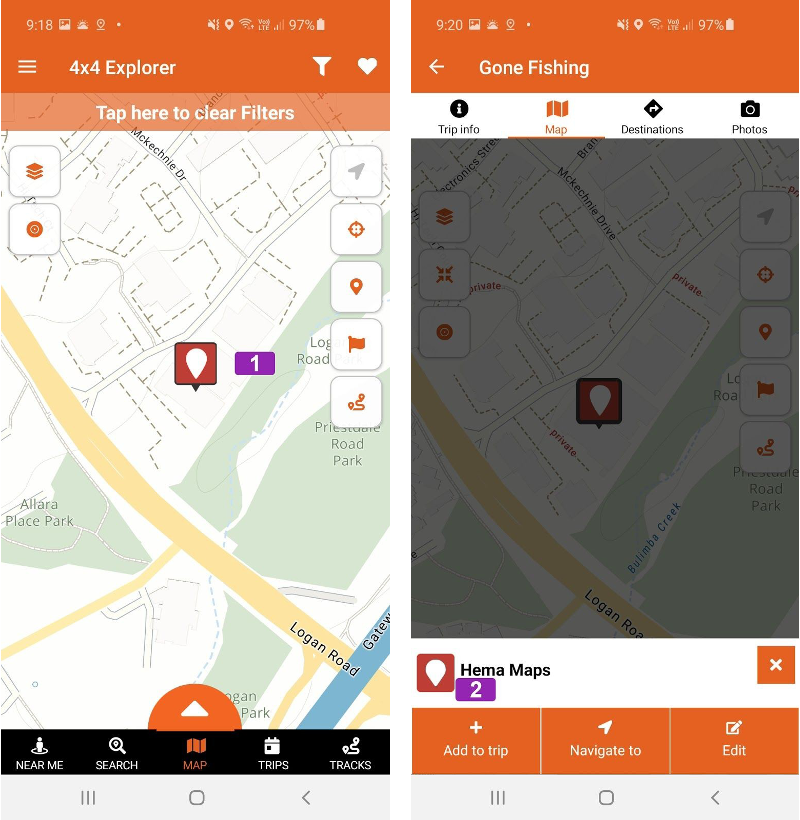
Once the Starting Point has been saved you will see a banner at the bottom of the screen to confirm this action.
You will also see that because it is the Starting Point it has the designation 1.
Endpoint
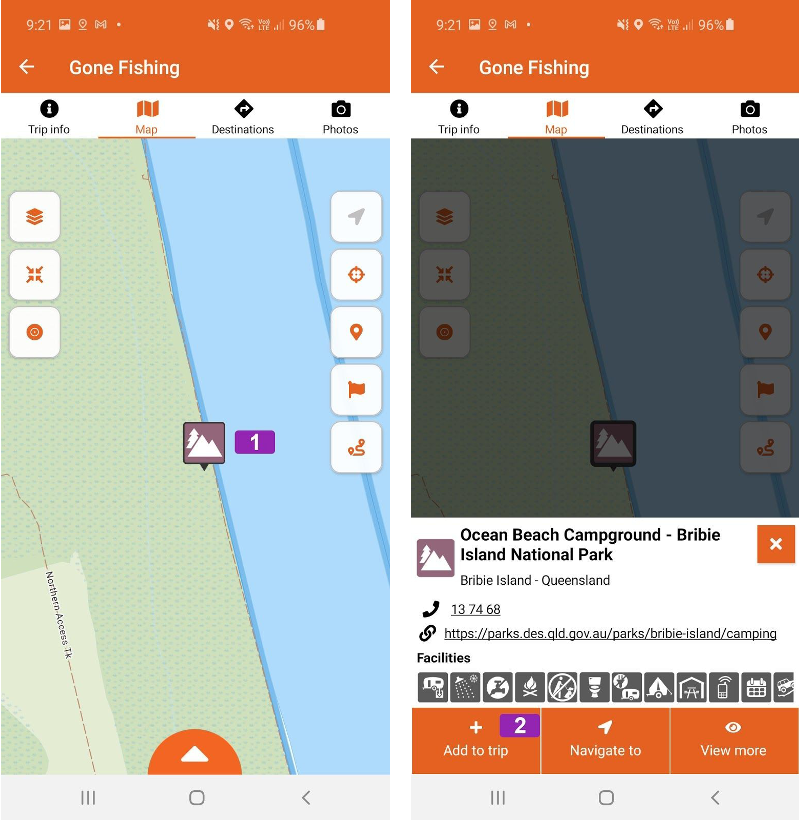
Once you have the Start destination saved you can now select the Endpoint. For this example we will use a point of interest as our end point [1]. Click on the point of interest to select that point of interest as the destination by clicking the + Add to trip [2].
You can confirm the details or edit the details in the Information panel and then click Save destination [3] destination in the bottom panel to save the details.
Once the destination has been saved the screen will go back to the trip map and show you the intended trip and the destination will be marked with the number 2.
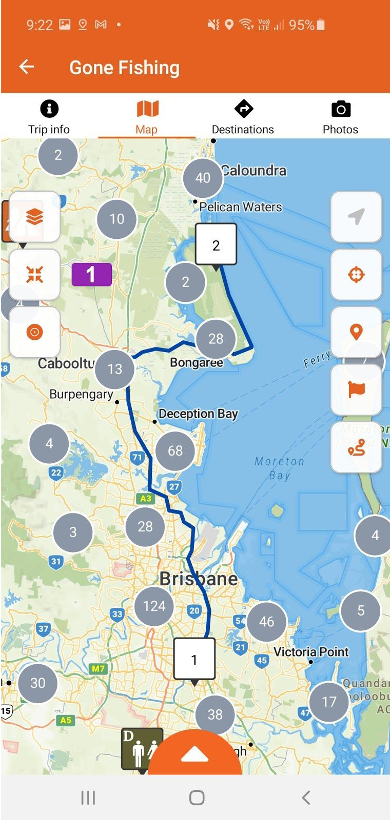
If you press the Zoom all [4] button you will then see the complete Trip.
 Destinations
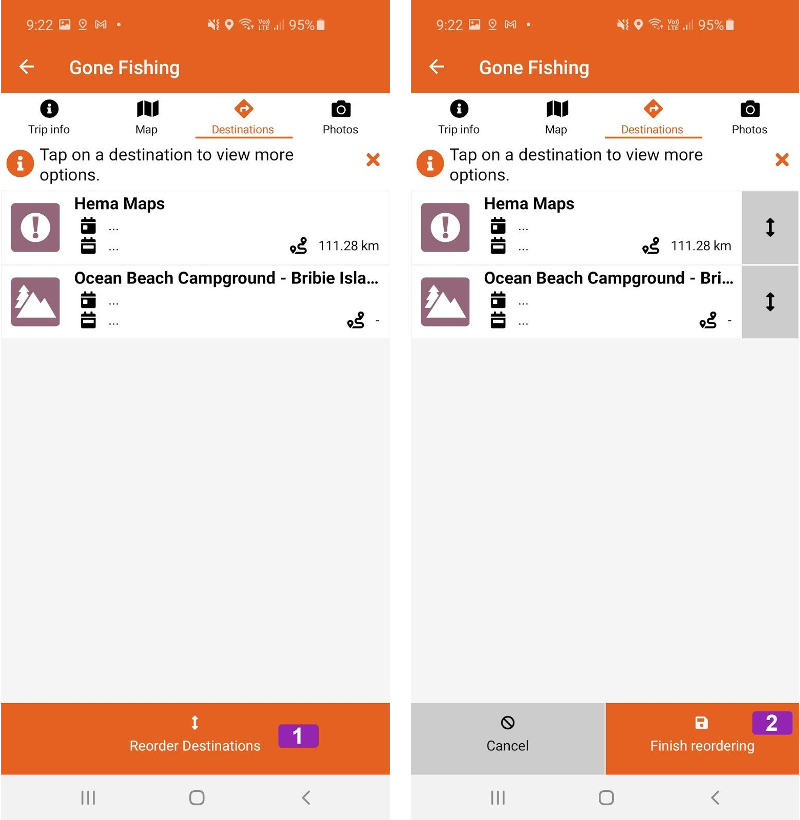
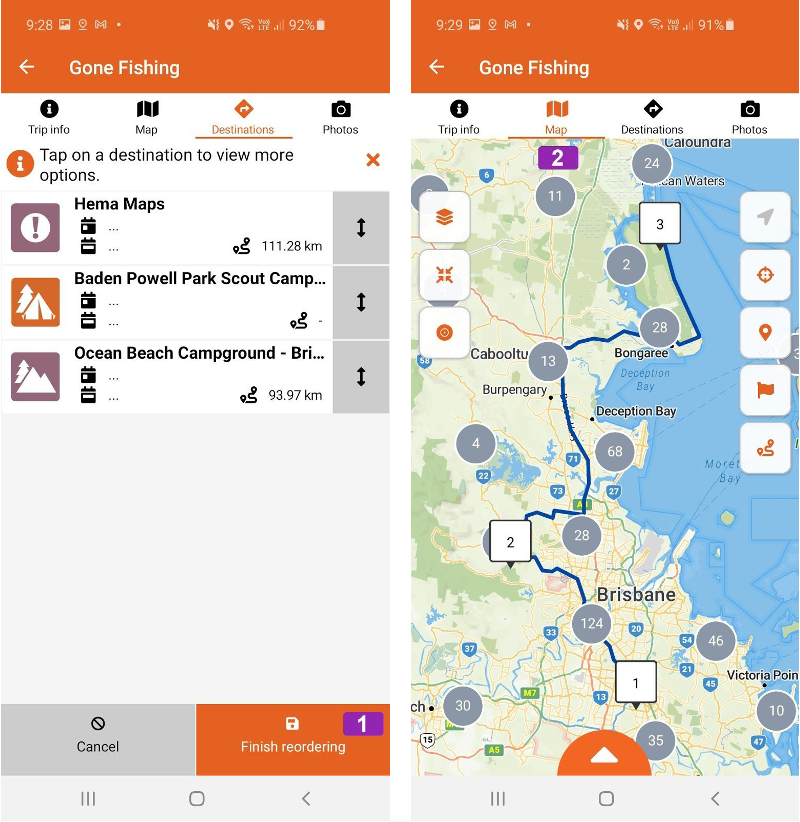
Once you have the trip generated you can add or reorder the destinations by clicking on the Destinations heading at the top of the screen.
From this panel you can change the order of the destinations and re-calculate the trip. Please note for this function you will need an active data connection. To reorder the destinations click on the Reorder Destinations [1] banner on the bottom of the screen and then using the Arrows next to the destination name drag to order you would like. Click the Finish reordering [2] banner to complete and save the trip.
Adding a destination

You can add more destinations to your trip by using one of the methods mentioned above. Once you have added the new destination the app will reroute the trip to include it and list it under destinations.
You will also see that the new destination has been given number 3.
 If you would like to re-order the destinations please follow the above instructions and then click Finish reordering [1] to make the changes. If you then click on the Map [2] heading you will see the changes, please note that the number of the destinations has now changed.
Photos
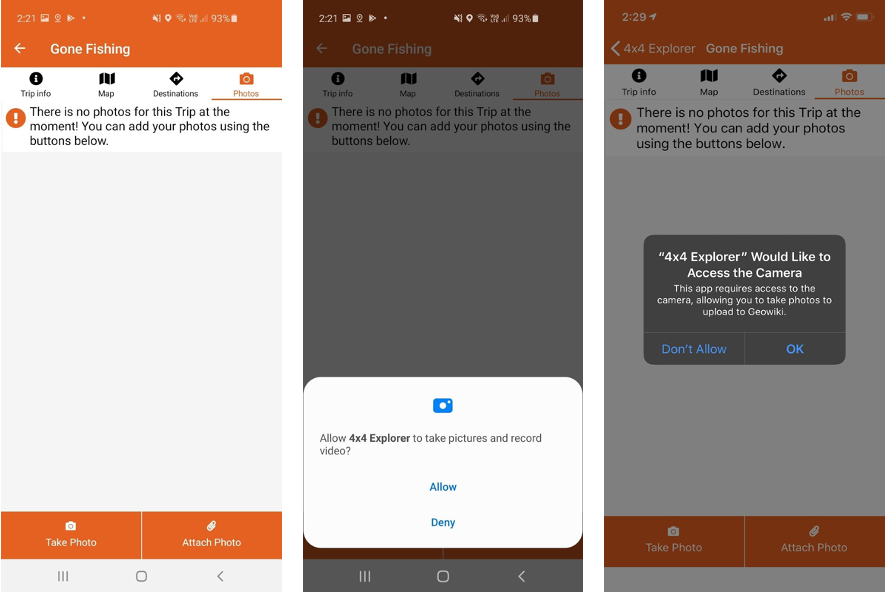
From this panel you can take photos using your device's camera and then link them to your trip.
To take a photo for your trip click on the Take Photo [1] banner at the bottom of the screen. The app will then open your device's camera App to the photo. Please note the first time you do this you will need to give the app permission to use your device's camera.
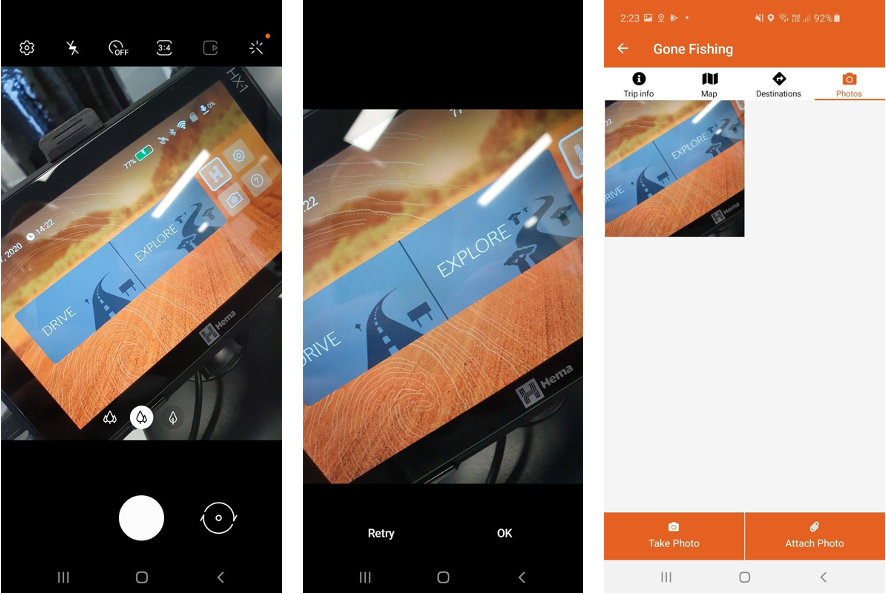 Once you have taken the photo your device will return to the app and you should see that photo listed.
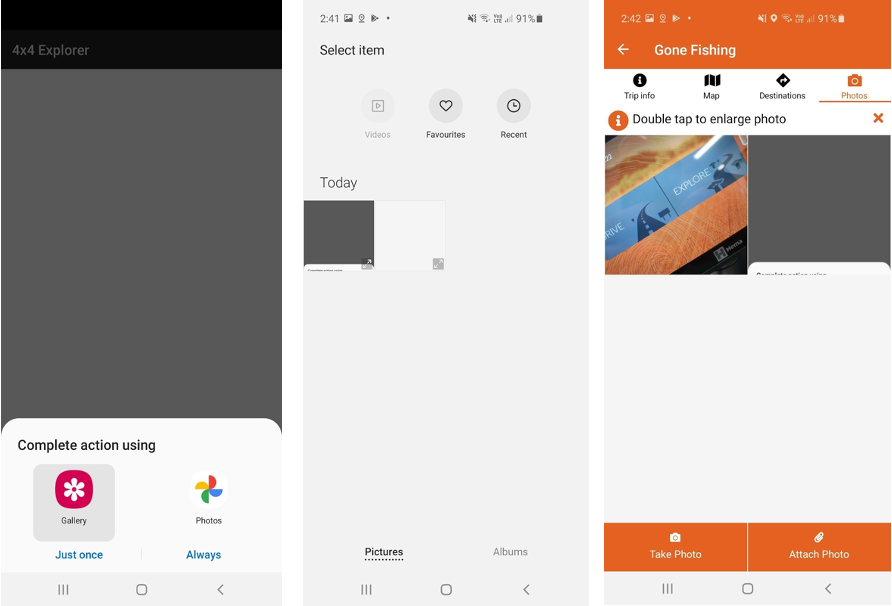 You can also attach a previously taken photo by clicking on the Attach Photo [2] banner. You can then select the image you want to attach. Depending on you device the screen shot above may vary. Once you have selected the picture you will see the App attaching the photo.
When the photo has been uploaded and then it will appear in your photos in the app.
To delete a photo from your trip, long press on the photo until a tick is displayed on the photo [1]. Then from the panel that appears at the bottom of the screen click Delete Photo [2] and then you will be asked to confirm your action, click OK [3] to proceed and the selected photo will be deleted.
Tracks
The tracks section of the Hema 4x4 Explorer app is primarily for recording the tracks you are travelling on.
Recording a Track
There are multiple ways you can record a track in the Hema 4x4 Explorer app.
Quick Record from Main Map
 The quickest way to start a tracking record is to click on the Quick Record icon [1] on the main map.
This will start a new track recording. When you want to stop recording the click the Quick Record button again which has now changed to a Stop button.
Once you have clicked on the Quick Record icon you will be asked to select a track or start a new one.
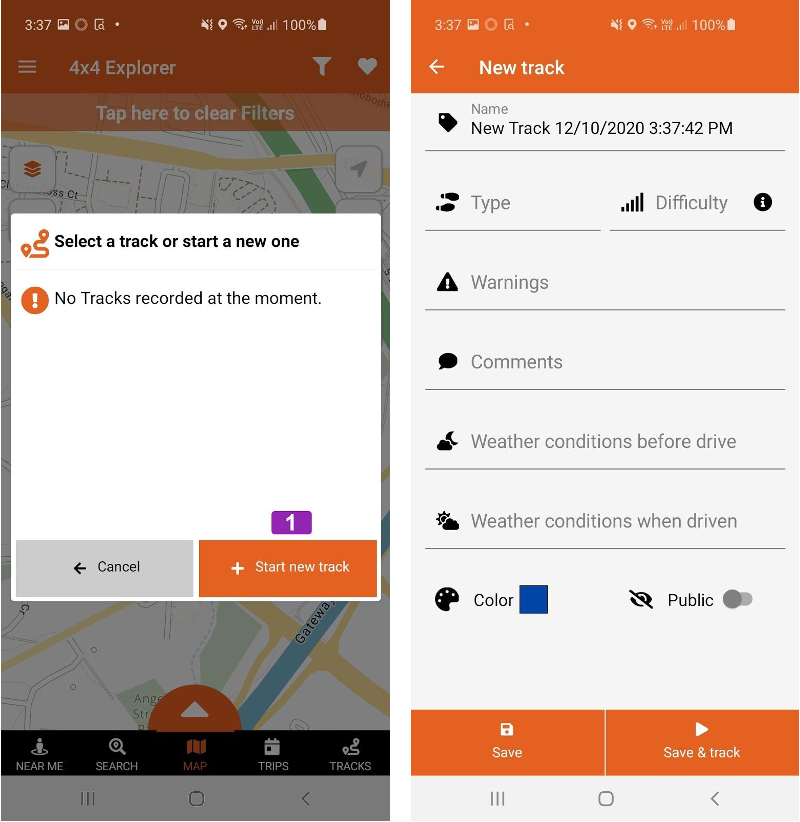 If you would like to start a new track click on the + Start new track [1] banner.
You can also select a previous track and continue that recording.
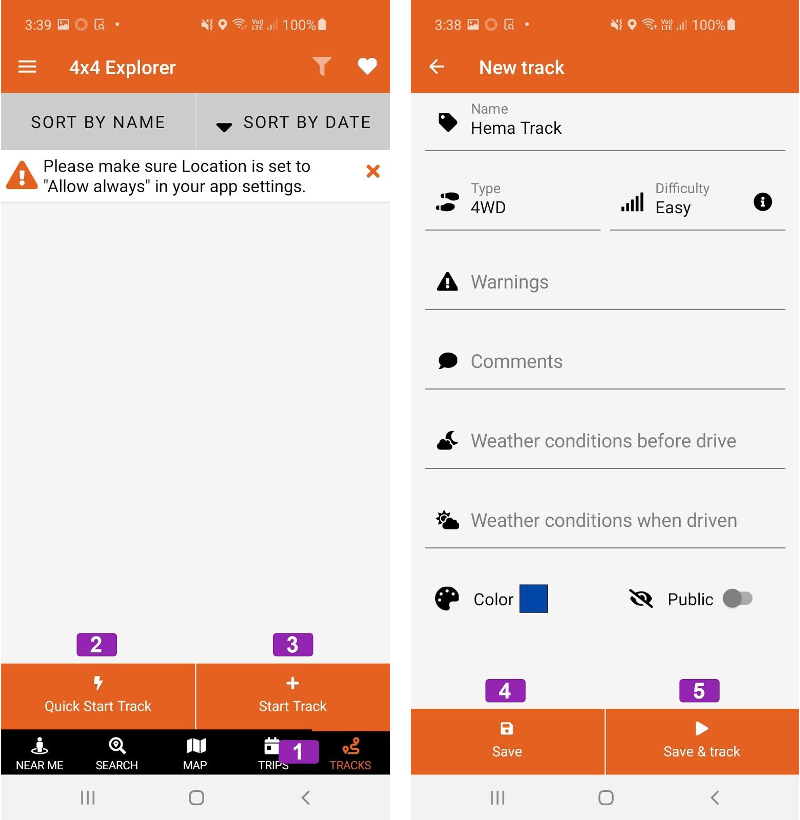
If you choose to start a new track then you will be asked to enter some information for the new track.
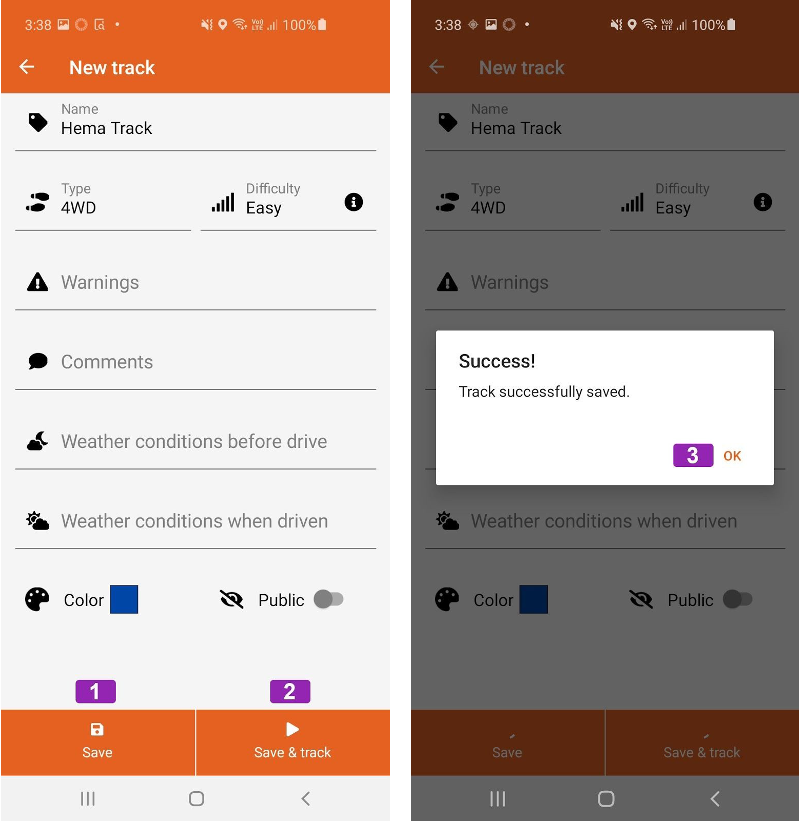 Once you have imputed the required information you can either Save the track or Save & track. Please note you will need to input the Type and Difficulty in order to save and start
If you click the Save [1] button in the bottom left then your track location will be saved and you can record at a later time using the instructions below concerning Starting a new track from the Track section.
If you click the Save & track [2] button in the bottom right hand corner you will be notified that the track has been saved and when you click OK [3].
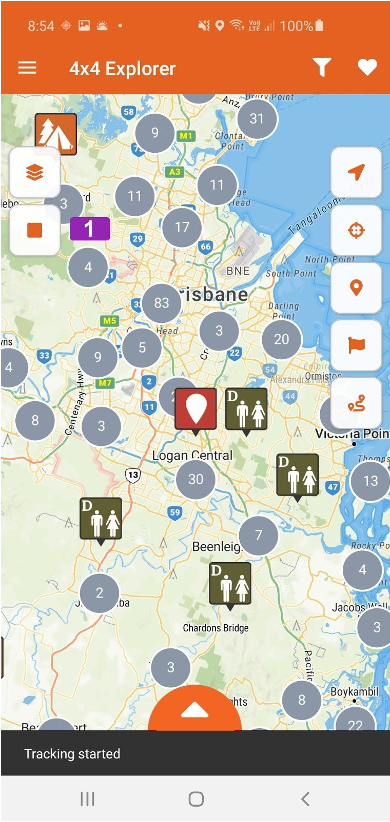 You will be returned to the Map and be notified that tracking has started by a banner on the bottom of the screen. As you drive you will see the breadcrumb trail start to appear on the Map.
When you want to finish the recording click on the Stop [1] button.
Starting a Track from the Track Menu
 The second way you can start a new track is from the Track Menu.
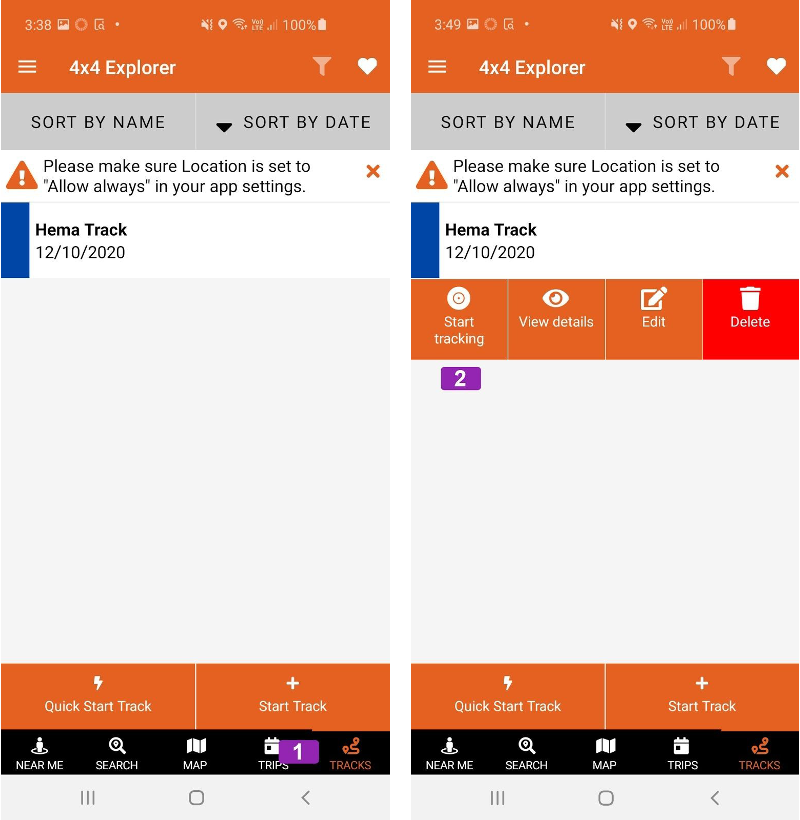
Click on the Tracks [1] heading in the planner menu bar and the Tracks Menu will load.
To start a new Track either click on the Quick Start Track [2] or + Start Track banners [3] at the bottom and then fill in the required information as per the Quick Record section.
When you ready to record click the Save [4] or Save & track [5] in the bottom banner.
Resuming a Track
 If you would like to resume a previously recorded Track, you can go to the Track menu.
Click on the Tracks [1] heading in the planner menu and then select the track you wish to resume. Then click Start tracking [2] from the drop down banner and this will then start the track recording from the last point.
Please note: If you resume the record from a different location to where you stopped the recording you will get a straight line between those two points.
Editing the Track Information
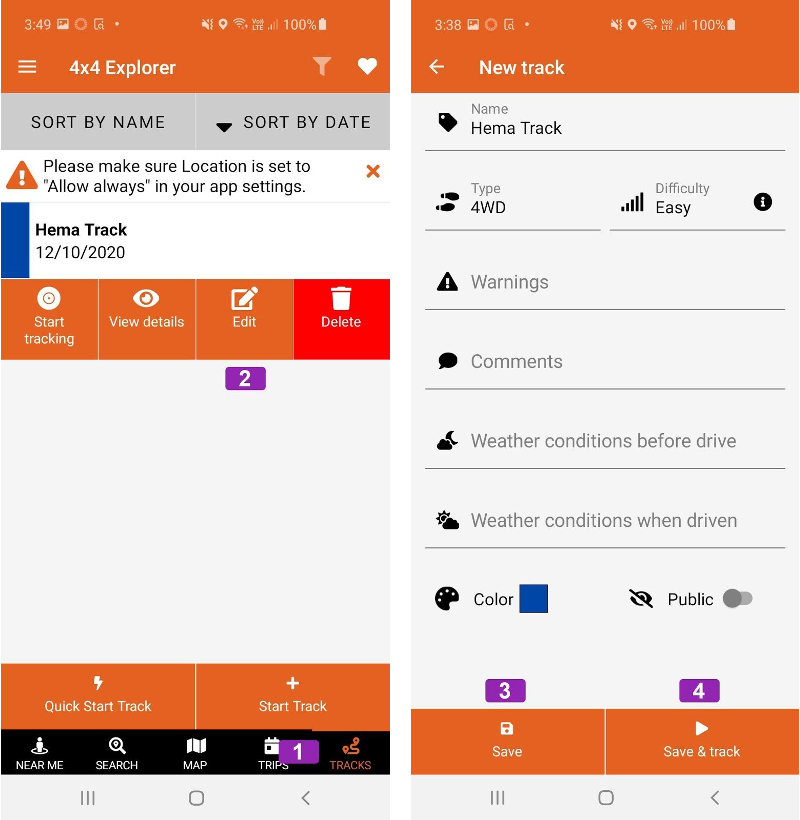 If you need to change the information associated with your Track after you have saved it, you can do this from the Track Menu [1].
From the Track Menu, click on the Track you wish to change the information for and then from the drop down banner click on Edit [2].
This will bring up the Track information, once you are finished editing the information click on Save [3] or Save & track [4] in the bottom banner.
Editing & Plotting Track Points
 Once you have a Track saved you can either edit the points on that track or add new points to create a new track..
You can do this by going to the Track menu [1], then clicking on the Track you wish to edit the points of. From the drop down banner click View details [2]. You will then see the Track name [3] at the top of the screen and the track on the map.
To enable the Track Editor click on the Track Edit [1] button and it should change to an orange icon. This will then show the Track points [2] along the track.
Add Track Points
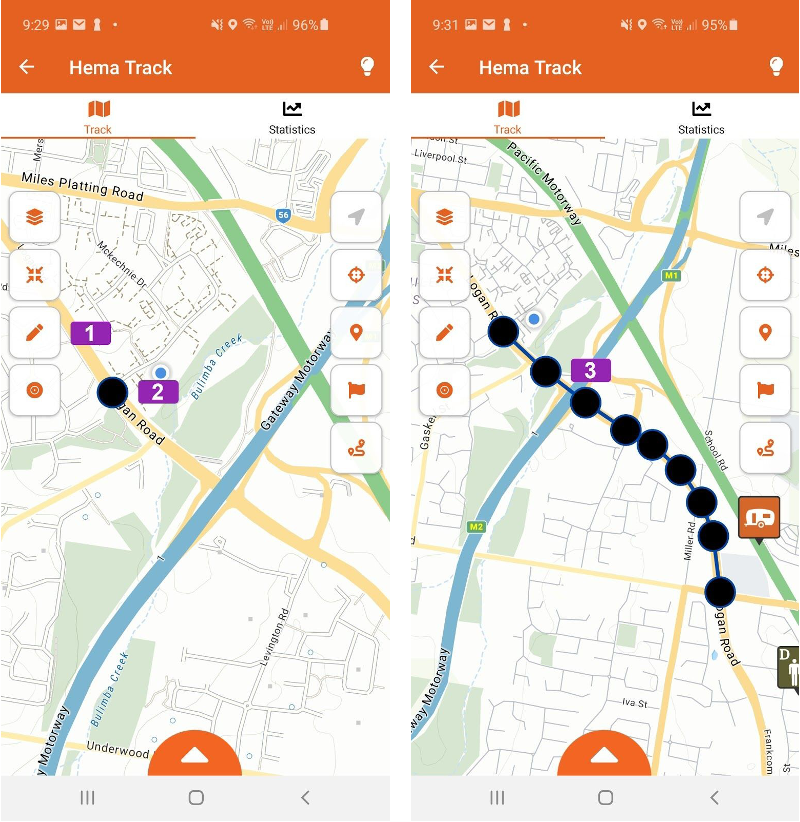 To add a new track point click on the map and a black track point [3] should appear. If you want to add more points just click on the map again and another track point should be added with a connection line. Continue to do this until you reach the desired point.
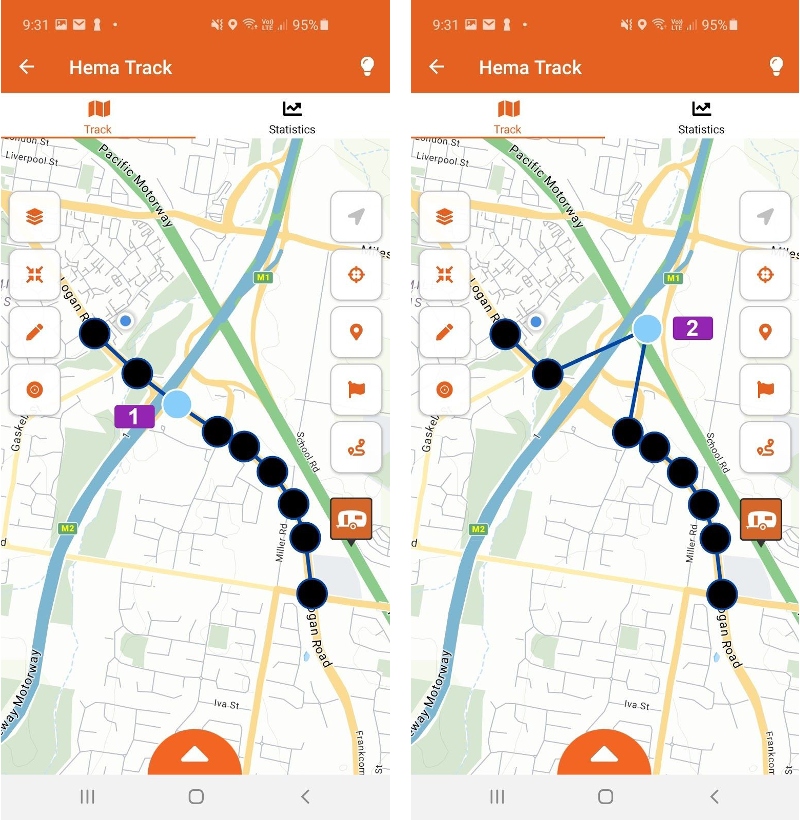 Edit Track Points
To edit a track point, click and hold down on the track point you wish to edit and that track point should turn light blue [1]. Click the location on the map you would like the track point moved to and the track point will then be at the new location [2].
To confirm the location change for the track point, click and hold on the track point and the track point will go back to black [1].
Edit Track Points Information
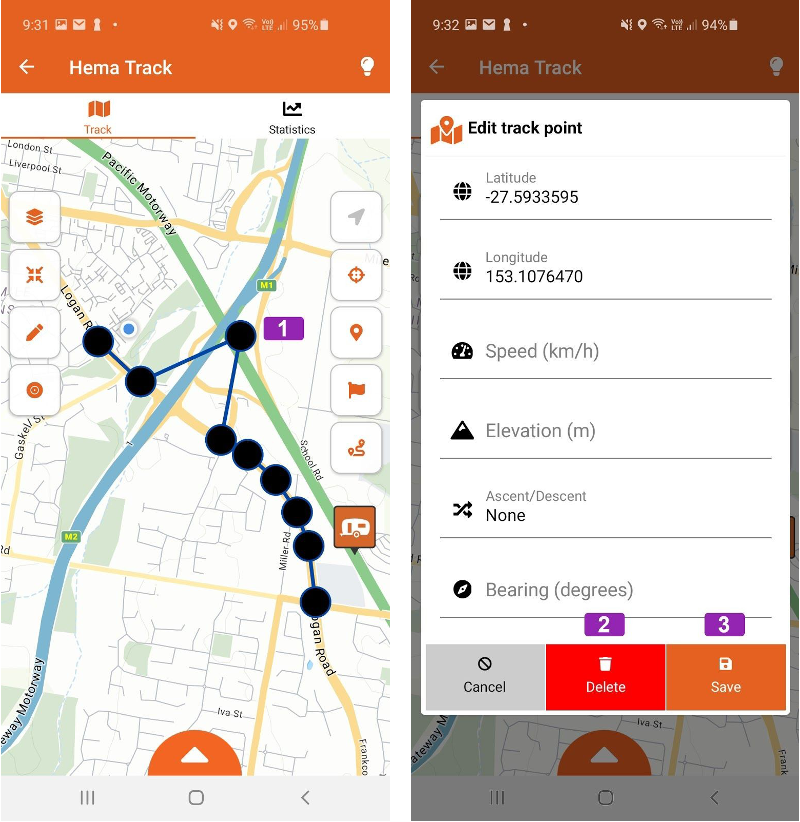 To edit the track point information click on the track point and the information screen will come up. You can update the information for the track point here. You can also remove the track point from this screen by clicking on the Delete [2] banner at the bottom. To save the changes you have made and return to the Track Editor click the Save [3] banner at the bottom of the screen.
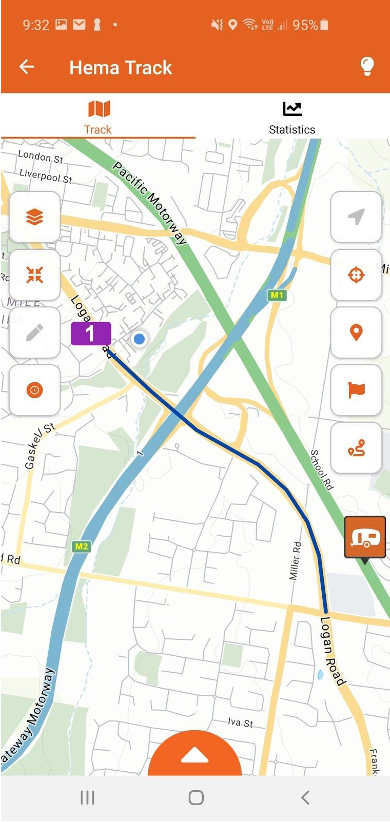 To save the changes to the track, click on the Track Edit [1] button and the icon will return to its original state and the track points will be removed and the track will remain.