You may wish to add some extra maps to your HN7, and wish to store them on a USB stick, which connects to the HN7 via the USB Host port.
There are 3 main steps to getting this working:
- Formatting your USB stick and copying map content to it
- Setting the HN7 Navigator USB port mode
- Configuring OziExplorer on the HN7 so it knows to look for maps on the USB stick
- No map visible when you start OziExplorer
Formattting your USB stick and copying map content to it
Formatting your USB stick will remove ALL content which currently exists. Be sure you wish to do this, or that you have another copy of the data somewhere else if it is important to you.
Any USB stick you wish to use MUST be formatted using the FAT32 or exFAT filesystems. The HN7 Navigator will not be able to access a USB stick if it is formatted with the NTFS filesystem.
FAT32 is an older file system which has been around on Windows for ages. exFAT is a newer version of FAT which is optimised for flash memory-based devices (such as USB Stick, SD cards etc.)
FAT32 had limitations with regard to maximum permissible file sizes (4Gb max), whereas exFAT does not.
This makes exFAT formatted devices the best option for video recording devices.
If you do not know how to reformat your stick with the correct filesystem, please search Google...
Format your USB stick on your PC. It is recommended to format using the exFAT filesystem for flash-based devices like USB memory sticks.
Once you have your stick formatted correctly, create a folder on it called OziExplorer Maps.
Under the OziExplorer Maps folder, create one or more sub-folders to contain your extra maps.
It makes sense to create sub-folders whose names reflect their contents, such as the examples shown below:
- \OziExplorer Maps\QLD-100k
- \OziExplorer Maps\VIC-25k
- \OziExplorer Maps\Spatialvision-VIC
- etc.
Copy your map content to the desired folder on the USB stick.
These files will need to be in the correct OziExplorer format to use them on the HN7, either OZF or ECW format (ECW is not generally reommended for mobile devices as it is not as efficient as OZF).
Set HN7 Navigator to correct USB port mode for use with USB stick
Next, we need to tell the Navigator that we wish to use USB in Host Port mode.

Go to the Settings screen by tapping the Settings icon
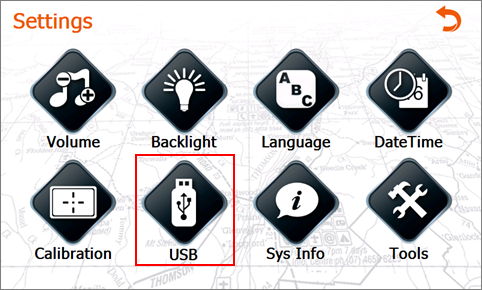
Go to the USB settings by tapping the USB icon
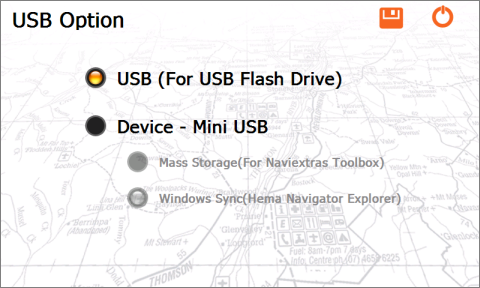
On the USB Option screen, set the HN7 to USB (For USB Flash Drive) mode.

Once you have made any changes to settings, to make these changes permanent, you need to save them by tapping the Save Settings button.
Exit back to the HN7 Main Menu
Insert your USB stick into the host port on your HN7.
Be careful with the device while the USB stick is inserted into the host port. If you drop it, or exert undue pressure on the stick while inserted, it could damage the stick, the USB port, or both. This will NOT be covered by warranty!
Changing OziExplorer settings so it will look for maps on the stick
Next, we need to tell OziExplorer that we want it to look in the folder containing your maps on the USB stick.
Start OziExplorer [4WD mode]

Go to the Settings page by tapping the Settings button on the right-hand toolbar.

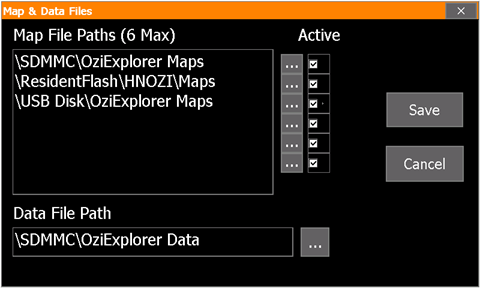
On the Settings page, tap the Map & Data Files settings icon. The Map & Data Files settings page will open, with the standard settings displayed, as shown below:
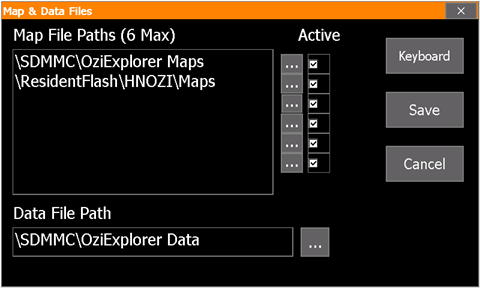
As you can see, the default OziExplorer configuration on the HN7 has TWO folders which contain maps:
- \SDMMC\OziExplorer Maps (The folder on the HN7's SD card which contains the majority of the offroad maps)
- \ResidentFlash\HNOZI\Maps (this folder on the HN7's internal storage contains some ancilliary maps which allow OziExplorer to display a useful map if the SD card is lost or not present in the HN7)
OziExplorer allows up to six folders to be included in its list of map paths. As you can see in the example above, the top two are occupied, and the bottom four are not.
It does not matter to OziExplorer that the bottom four paths are empty, even though they are marked active ("ticked").
We are going to add a third folder to the list of folders which OziExplorer looks in.

Tap the Select folder button next to the third line.
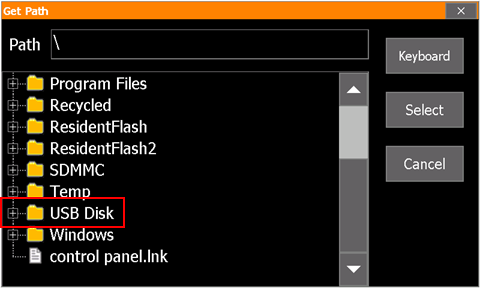
You will notice that in the list of folders displayed, that you have a folder called USB Disk. This is the folder which represents your USB stick.
Tap the plus sign (+) next to the folder to expand it. You will see any sub-folders on the USB stick displayed, as shown below:
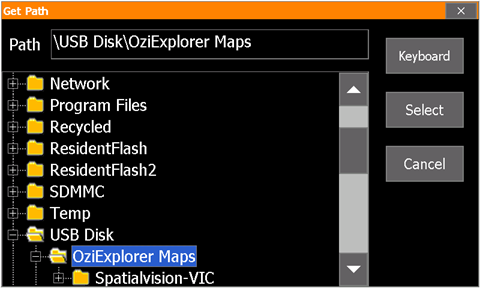
You should see the OziExplorer Maps folder which you created on your USB stick earlier in this process.
If you click the + button next to OziExplorer Maps, you will see any sub-folders you created under OziExplorer Maps.
Double-tap on the OziExplorer Maps folder to add that folder to the Path field.
As the example above shows, the Path field now contains \USB Stick\OziExplorer Maps, which is precisely what we are trying to achieve.
You do not need to specify every sub-folder under OziExplorer Maps. As long as you point OziExplorer to the upper-level folder, it will happily index all the sub-folders below this automagically.

Once you have the path set correctly, tap the Select button.
You will be returned to the Map & Data Files screen, where your new folder will be loaded into the third row down, as shown below:

Once you are happy with your settings, tap the Save button to make the changes permanent.
Any operations involving maps (such as indexing, or opening maps manually, etc. will now utilise the extra maps on the USB stick.
The only thing to note here is that when you use the Open Map button from the Maps page, it will always default to the first folder in the list of folders on the Map & Data Files screen.
Running OziExplorer without the USB Stick in the USB port
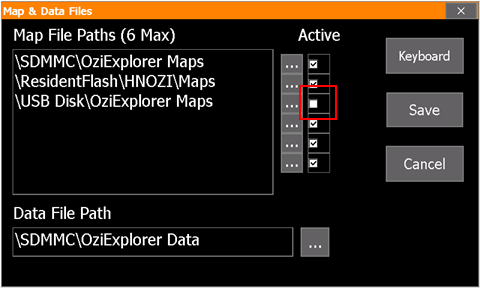
If you are going to use your Navigator in 4WD mode without the USB stick inserted for a period of time, it is recommended that you temporarily disable access to the folder you have created by unticking it from the Map & Data Files settings page.
You do not need to completely remove the setting for the USB Disk map folder, merely disable it by unticking the folder in the list, as shown below:
-png.png)
Remember to save the settings once you have made changes by tapping the Save button.
No map visible when you start OziExplorer
Whenever you run OziExplorer [4WD mode], it remembers the map you have open when you exit the program.
This means that next time you open the program, it re-loads the last used map.
If you load a map from the USB stick storage, then shut down OziExplorer, and remove the USB Stick, OziExplorer has no way to re-load the last used map (as it is on the now removed USB stick).
If this happens, OziExplorer will display a blank white panel where the map panel usually is.
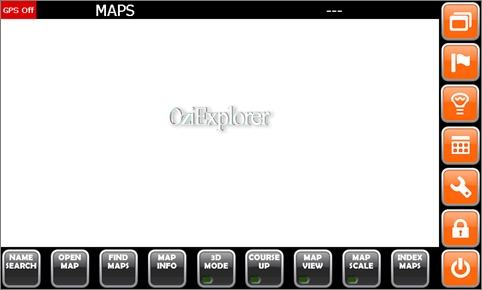
Simply go to the Maps page, and use the Open Map button to load another of the standard maps from the folders on the SD Card.